Preparation is the key to many things in life from business success to personal
achievement. It is also the key to minimizing the damage when injuries happen.
Must Have Items in Your First Aid Kit
A first aid kit is one of those things you know you should have, but probably don't.
Even if you do, you probably do not know where it is or what is in it. Much like getting
the oil changed in your car, it is something droll that you should keep on top of. In this
case, you should both have a first aid kit and keep certain things in it.
Why should you keep a first aid kit? Well, you never need it until you really need it.
This is particularly true if you have kids or are in a situation where medical attention
is not readily available. Such scenarios can include camping or a natural disaster of the
hurricane, tornado, flood or fire designation. Whatever the situation, you do not want to
get caught unprepared for injuries. This is particularly true if the injuries involve cuts
to the body because infections can be deadly if not treated.
So, what are the basic things you should keep in a first aid kit? Here are a few:
1. Bandages of varying sizes
2. Gauze of varying sizes
3. Antiseptic Spray or rub
4. Band aids
5. Aspirin or other basic pain medication
6. Over the counter muscle relaxant for pulled muscles
7. Sterile wipes
8. A strip of cloth you can use for a tourniquet in worse case scenarios
9. Tweezers for splinters
10. A Swiss Army knife with the scissor attachment
11. Sun block
This may sound like a lot of stuff, but you can roll and compact it really easily.
For many people, prescription medication is a must for various health issues. If you
fall into this category, make sure to pack some extra medication from time to time. You do
not need a lot, just enough to get you by for a day or two.
Obviously, maintaining your first aid kit is not a high priority item for most people,
but it should be. If you get injured, you will be thanking the high heavens you have it.
About the Author
John Grimes is with All Terrain - makers of first aid products for the outdoors
and life.
There are countless numbers of different models of knives available on the market.
Unless you know exactly what to look for and what you need, choosing the right knife can
be nearly impossible. But if you're armed with the tips in this article, you'll be able to
easily choose a knife that perfectly fits your needs.
The first thing you should determine is what you'll be using the knife for - will it be
for camping survival, hunting, defense or some other activity? Once you've decided what
activities you plan to use the knife for, you can determine what features you need the
knife to have.
Each outdoor activity requires a specific set of features. Here are some common outdoor
activities, along with suggested features that you might need.
Hunting: A hunting knife will need to have a blade shape suitable for skinning animals.
The size of the knife will be largely determined by the game you are hunting.
Boating: A knife for boating will need to be stainless steel, to resist corrosion. The
knife should be sharp, and you'll probably want a partially serrated blade for cutting
rope.
Fishing: You will probably want two separate knives for fishing - a fillet knife and a
general purpose knife. The general purpose knife should be a small to medium knife with a
stainless steel blade.
Survival: A survival knife should ideally be a large, very tough knife. It should be
highly resistant to rust, and tough enough to handle a lot of abuse. If you're stranded in
the wilderness, you're not likely to be able to take care of your knife very well, plus
you may need to do things with it that you normally wouldn't.
Camping: There is probably not one perfect camping knife. You'll have to make a choice
based on the type of camping you do, as well as what other tools you have, such as a
machete, saw, or axe.
You always want to be sure that the knife you pick is suitable for the activity you
plan to use it for.
Survival Knives are intended for
survival situations. Survival knives are carried by Military Troops, Hunters, Backpackers
and Campers. Multitudes of participants in other outdoor activities carry and use survival
knives. What should you consider when selecting a survival knife?
Survival knives have many designs and sizes. There are long and heavy survival knives
with a design similar to a machete. Some survival knives are still built based on the
design of the Bowie knife, with a long strong blade. Still other survival knives are of a
folding design for compact carrying. We will cover some of the designs and features
commonly found on survival knives.
Most survival knives have a multi-purpose blade. The blade can usually perform multiple
tasks like chopping,cutting, spearing and prying. The handle often has a lanyard hole so
the survival knife can be tied to a pole to make a spear.
One of the most common features is a section of saw like teeth on one side of the
blade. These teeth are often marketed as being a saw that can be used to cut wood. Due to
the design of the teeth and the limited length of most survival knives their usefulness as
a saw is limited. These teeth on the survival knives were designed so crews could more
easily cut through the relatively thin metal skin on a downed aircraft. These teeth can be
used to scrap wood or bark to make tinder to help start a fire. Some survival knives do
have actual saw type teeth on the blade. You are still limited in what you can cut by the
length of the survival knife blade.
Some survival knives have a hollow handle feature. The movie "Rambo"
popularized this style of survival knives. Survival Knives like these are sometimes called
"Rambo" knives. One of the selling points to these survival knives is gear can
be stored in the handle. A drawback to many hollow handle survival knives is the handle is
attached to and not actually part of the blade. This creates a weaker point that may fail
when you need your survival knife the most. There are some hollow handle survival knives
that are fashioned out of a single piece of steel. The handle on these survival knives is
part of the blade so you do not have the weak point. There is another consideration with
hollow handle survival knives. If you lose your survival knife you also lose all the gear
stored in the handle.
The blade on survival knives. As a rule of thumb you should avoid survival knives with
a double cutting edged blade. This weakens the tip and also increases the risk of getting
cut while performing tasks with survival knives. Some of these tasks may include cutting,
slicing, prying, chopping or digging. Fixed blade survival knives should have a full
length tang. This means the blade on survival knives should be a single piece of steel
that runs all the way through the handle. The blade should be good quality steel that is
strong and will also keep a sharp edge.
The blade length on survival knives is often the subject of debate. Most people should
avoid the huge "Rambo" style survival knives. They are heavy and can be awkward
to use for many of the tasks survival knives may be expected to perform unless you are
familiar with how to use the knife. Many people feel more confident with long heavy bladed
survival knives. Others feel survival knives with a long blade are too awkward for some of
the tasks they expect survival knives to do.
My opinion, based on experiences I have had as a police officer, while hunting and
while camping, is this. The best survival knives are the survival knives you trust with
your life AND that you are comfortable using. I use this analogy A .22 pistol is much more
effective in the hands of someone that knows how to use it, than a 30-06 rifle is in the
hands of someone that doesn't know how to load the bullets or is afraid of it.
Survival Knives do not have to look fancy. A good solid useful design is what you
should be looking for when evaluating survival knives. Any knife can be used as a survival
knife if that is the only knife you have.
The selection of survival knives is a personal choice. Evaluate what type of terrain
you will be in (Desert, Jungle, Woods, Rocks), what your most likely needs will be
(digging for water, building a fire, making a shelter, cutting bandages, gathering food),
your own physical strength (Don't buy a 5lb. Knife if you can't use it) and keep in mind
the points discussed above. When you make your selection remember - Cheap is not a bargain
when you need to survive. You do not get any ribbons for finishing second in a survival
situation! Buy quality survival knives and equipment, know how to use your equipment, take
care of your equipment and they will take care of you. Stay safe and get outdoors as much
as possible.
Kirk McCormick is the Director of North American Enterprises, Inc an internet marketing
company with offices in Nevada and Oregon. He has extensive experience in Law Enforcement
and had enjoyed the outdoors for many years. For additional information please visit http://www.northamericanknives.com or http://www.swissarmyknifemall.com. You may
e-mail nae@northamericanknives.com
Which features should a multi-tool have? Backpackers and survivalists
can debate this question ad nauseum, and for good reason. Today's tools
offer an incredible array of features. From scissors to fishing hook
removers, accessories are wide ranging. What works for a backpacker may not
be ideal for a fisherman, and what survivalists consider essential may not
be important to the casual camper.
To
clarify the situation, below are a few multi-tool features generally
considered important for any outdoor enthusiast.
Saw
blade.
A saw blade can come in handy in any number of situations, from cutting
firewood to building traps and snares. In a few short moments, a saw blade
can transform a knobby stick into the perfect walking aid.
Pliers.
While in the wild, you can use pliers to pick up hot items, such as a
singing teakettle. Pliers are also incredibly handy for removing splinters -
just be sure you clean them or any other accessories before using them to
provide first aid. Finally, pliers may be used to bend metal items (such as
pack frames and tent poles) back into shape.
Wire
cutters.
If you plan on fishing often, your multi-tool should include wire cutters.
Wire cutters may be used to remove hooks from fish - and from your fellow
fishermen. Hikers and backpackers may also find wire cutters useful in
certain wilderness first aid situations. For instance, if a person's skin
becomes trapped in a zipper, wire cutters can destroy the zipper and free
the tender skin.
Scissors.
A long-running debate among wilderness lovers is whether proper backpacking
multi-tools should include scissors. Many survivalists believe scissors are
unnecessary provided the tool already includes a knife blade. And because
every ounce counts when you're carrying a 60-pound pack over miles of uneven
terrain, many claim that scissors just add dead weight. However, there are
certain times when scissors are extremely handy. Detailed jobs, such as
sewing tears in tents and clothing, are easier when you have a pair of
scissors available. Finally, scissors may be used for cutting away
hangnails, which can easily become infected if they are torn off while on
the trail.
Flat-edge blade.
No multi-tool is complete without a good, sharp knife blade. You'll find
yourself using this attachment for everything from preparing food to cutting
cord to whittling wood.
Lanyard hole.
A lanyard hole allows you to attach your tool to a cord, which you can then
loop onto your pack. This will help you keep your multi-tool handy on the
trail. If you're the type of person who tends to lose items easily, a
lanyard hole is an especially useful feature.
Screwdriver.
If your gear is technically advanced, chances are it contains screws that
will occasionally need tightening. The screwdriver attachment is also a good
idea for hikers who wear glasses. If your glasses happen to come unscrewed
on the trail, your screwdriver attachment will be a true godsend.
File.
This is one attachment that most backpackers agree is not necessary in a
multi-tool. A file is helpful for woodworking, but it just adds unnecessary
weight to a back country tool.
Can/bottle opener.
Imagine this: You finally reach your camping spot for the night, after six
miles of grueling hiking, only to realize that you have no way to open that
can of beans you brought along. Even worse, you can't even crack open a cold
one. It is hard to improvise a way to accomplish these tasks. Can and bottle
opener features are beneficial for most multi-tool users.
Locking mechanisms.
One thing to look for in a multi-tool is a secure locking mechanism. If your
attachments can't stay locked securely in place, they may suddenly close on
a tender finger.
Toothpick.
This is one feature most backpackers can do without. First, who wants to
watch a companion picking at his or her teeth by firelight? Moreover,
toothpicks found on multi-tools are generally not very clean; the inside of
your multi-tool can easily pass on germs and cause gum infections if you're
not vigilant about toothpick cleanliness. On the other hand, a toothpick can
be an invaluable poking tool for clearing clogged stoves.
From
scissors to toothpicks, today's multi-tools offer a cornucopia of features.
Which ones you need will depend on which outdoor activities you prefer. In
general, backpacking tools should amount to no more than five ounces in
weight; any more than this, and you'll feel like you're lugging around a car
battery with you on the trail.
For
all of you outdoor enthusiasts, it is always smart to have a great
multi-tool or two on hand. For a
selection of quality multi-tools that can be used in a variety of different
situations, take a look at the website for Coast Products, a leading
manufacturer and distributor of multi-tools, LED lights, and sporting
knives, at
www.CoastPortland.com.
Hiking, and in particular hiking in remote areas, is a great experience if
approached with due regard for fitness, safety and skill.
One of the major skill categories, is the ability to navigate with or without compass and
map. Ideally, no one should head off the beaten track without map or compass, but what if
you find yourself in that situation, or you lose or damage your compass?
Here are a few basic 'skills' that could one day be of use.
Finding direction by using your watch...
If you have a watch that is working correctly, you can always quickly determine the points
of the compass as long as the position of the sun is visible.
The method used varies depending upon which hemisphere (northern or southern) that you
happen to be living in. The following methods are described using an analog watch, (that's
a watch with an hour and a minute hand) but they can be applied just as well if you own a
digital watch ? just use your imagination to superimpose the 12 hourly numerals and the
relevant position of the 'hour hand' on the face of your digital watch.
Northern Hemisphere
Holding your watch horizontally, point the 'hour hand' of your watch at the sun. Note the
direction that lies exactly midway between the 'hour hand' and the numeral twelve on your
watch. This will be South.
Once you have established this, it will be easy to determine the other points of the
compass.
Southern Hemisphere
Holding your watch horizontally, point the numeral twelve on your watch at the sun. Note
the direction that lies exactly midway between the twelve and the 'hour hand'.
This will be North.
These methods will give you a good approximation of compass direction.
If your watch happens to be adjusted for daylight saving at the time, then 'remove' the
daylight saving for greater accuracy.
Another method of determining compass points can be used if you do not have a watch. This
method takes longer and also requires enough sunlight to cast a shadow...
To find North without a watch
Before noon, on level terrain, position a stick of about 3ft upright into the ground. Mark
the tip of its shadow with a peg or stone.
Using the tip of the shadow as a radius, draw an arc around the stick.
The shadow will shorten as it approaches noon, pulling back from the arc. It will then
lengthen again - where the afternoon shadow once again touches the arc, place another peg
or stone.
Now draw a straight line between the two pegs/stones - this will be an East/West line,
with the first peg being in the westerly direction.
You can now draw a North/South line at right angles to the East/West line.
The following (less accurate) method can also be used at any time of the day without
drawing an arc...
Peg the tip of the first shadow, then about 20min later peg the tip of the moved shadow.
Draw a straight line between the two pegs, and this will be an approximately East/West
line, with the first peg again being the westerly one.
A typical error when lost, is a tendency to wander off what you may think is a straight
line bearing, sometimes even slowly circling back on yourself.
To prevent this, note an object (tree, rock, terrain feature) that lies directly ahead of
you in the direction you wish to travel, then aim for it. When you reach it, take another
bearing on the direction you wish to head, sight another object directly ahead of you and
repeat the process.
In areas of restricted distance visibility, you may have to repeat this quite often over
short 'legs' to ensure that you are remaining on course.
Keeping a course by the clouds...
What if it is a cloudy day with no sun visible to get a bearing on, or the bush canopy
prevents you getting a clear "shot" at the sun?
Well, if you are lucky, it may be windy with the clouds moving in a constant direction -
note the directional flow of the clouds, and adjust your course relevant to their
direction. e.g., If the clouds are moving from your front from right to left over your
shoulders, keep them there, at the same time, sight an object straight ahead of you and
head for it.
To retrace your steps in the same general direction, just do an about turn, then keep the
clouds moving from behind and now left to right over your shoulders, and repeat the
process. Being aware of your surroundings will often pay off, so try to cultivate that
habit.
George Spearing is the author of "Dances With Marmots ? A Pacific Crest Trail
Adventure" http://www.danceswithmarmots.com
Outdoor experiences include thru-hikes of the Pacific Crest Trail, Great Britain, and the
North Island of New Zealand.
Navigation is an huge subject and you could spend hours and hours reading
up on it, as there are many books available on the subject. I would thoroughly recommend
getting a good book on the subject and using that to learn from. Your life could easily
depend on your navigation skills.
Navigation is important in everything to do with the outdoors, from driving the car to
where you want to go, (yes I have ended up going the wrong way down the M6) to micro
navigation in white out conditions where your life depends on exactly how well you are
reading the compass and counting your steps.
Here are some of the basics that you would need to know.
Maps
Maps come in a variety of shapes and sizes. The important thing to look out for is the
scales on the map. Obviously, you need to have the right map for the area you are planning
on going walking!
Ordnance Survey are the main map producers in this country and perhaps make some of the
best maps in the world. OS make two different ranges of map that are suitable for walking.
These are the Explorer Maps and Landranger Maps. These maps cover the whole of the British
Isles on a grid based system. This can be viewed on the OS Maps website so that you can
see exactly what map (s) you need before you order them.
Ordnance Survey Explorer Maps are orange in colour and include the Outdoor Leisure range
as well. (Orange with a yellow flash). These maps are 1:25000 (4cm to 1km; 2.5 inches to 1
mile) scale and show a lot of detail. Some people would argue that it is too much detail
and can confuse navigation at times.
Ordnance Survey Landranger Maps are pink in colour and are based on a 1:50000 (2cm to 1
km; 1.25 inch to 1 mile) scale. Because of this they cover a much larger area, useful if
you are doing a long walk such as the Coast to Coast or the route you are doing is on the
corners of two or three Explorer maps.
The other big map producer is Harvey. Harvey Maps are based on the more popular areas of
the UK and can have long distance walking routes and national trails all on one map, for
example the South Downs Way. Harvey maps will also give information on where you get food,
drink and accommodation. The maps also give more local interest information and are
printed on a waterproof paper. The scales are generally 1:25000, the Harvey Superwalker
Maps and 1:400000, Harvey Walker Maps.
Using a map
Maps are great, and will show you where you are and where you need to be as well as all
the other topographical information you will need to enjoy your walking and travelling.
Primarily you will need to know how to take grid references on a map to pin point your
position and the position of where you are heading to.
All maps are covered in a series of gridlines that can then be equally divided into
smaller squares (to do this you can use the markings on your compass or a roamer scale)
These gridlines are referred to as Eastings and Northings. Eastings going horizontal on
your map and Northings going vertical on your map. When reading the numbers on these
gridlines to get a grid reference, think of this as along the hall, then up the stairs.
Compasses
A compass is essential when walking in the outdoors and ideally should be used with your
maps. Learning to use a compass properly can be a life saver if you are out and the
weather turns bad. Silva are one of the top compass manufacturers in the world, which is
why I have chosen to stock them on this web site. Their ranges covers everything from a
basic beginners compass to complex navigation systems.
Choosing a compass
For most people the ideal compass would be the Silva Ranger 3. If you want something with
a longer base plate for taking better bearings, as well as a magnifying glass and
orienteering markers, then the Silva Expedition 4 would be the ideal choice.
As compasses work with a balanced magnetised needle, they designed to be working for
specific regions. The Voyager series are for global use and have a multi region balanced
needle.
Using a compass
To take a bearing on a map (a bearing will show you the direction you need to travel)
follow the Silva 1-2-3 instructions as detailed below. For further information please look
at http://www.silva.se/outdoor/index.htm
Taking a bearing from the map
Use the SILVA 1-2-3 SYSTEM as follows
1. Place the compass on the map with the edge of the compass along the desired line of
travel.
2. Rotate the compass housing until N on the dial points North on the map. Check that the
compass housing red/black north/south lines are parallel with the maps meridians.
3. Hold the compass in your hand and turn yourself until the red end of the compass needle
(North) coincides with the red arrow in the bottom of the compass housing. The front of
the compass with the direction of travel arrow is now pointing towards your destination.
Route cards
Route cards are generally used for navigation with young groups of people such as the
those doing a DofE Award (Duke of Edinburghs Award) expedition and Scout Expeditions.
Route cards will show where you are going, directions, bearings, time, distance travelled
and basically provide you with a detailed plan of your route. This will be extremely
useful whilst out navigating, helping to reduce the chances of getting lost. Route cards
are also important to leave with someone at the base camp in case you or the group get
into distress. The route card will then provide information that will help you be found
and rescued.
I hope you found it useful. Contact me if have any other questions.
Gareth Sear has been involved in the outdoors industry for over ten years. Through this
time and experience in 'going out there' he has built up a huge knowledge of walking,
camping, travelling and most things associated with this. Has a great understanding of
travel accessories and walking accessories. http://walkandtravel.com
As the character Clairee Belcher so famously said in the movie Steel Magnolias,
"The only thing that separates us from the animals is our ability to
accessorize." Today, handbags have surpassed jewelry and shoes as the ultimate
fashion accessory. Indeed, for many women, a handbag is much more than a vehicle for
carrying items around; it's a statement of identity. Although they're more utilitarian in
nature, the same thing can be said for backpacks, duffel bags, luggage, sports bags,
cooler bags, and even laptop briefcases.
Any parent who has ever shopped for school backpacks knows that a backpack is more than a
bag for carrying books; the color, the features, and the design of backpacks are all
important to a child, teen, or college student. Likewise, someone who spends their leisure
time hiking may want you to think function is more important than fashion, but they want
their hiking backpacks to both fit great and look great. Ditto for travel bags and even
fanny packs. Regardless of the type of backpack or bag, the owner wants to feel as though
it reflects his or her personality.
That doesn't mean that you have to sacrifice quality for style, though, or that you have
to buy backpacks that are the equivalent of the stiletto heel - attractive but completely
impractical. You can indulge your fashion preferences while still buying affordable,
well-constructed backpacks and bags.
Here are some tips for finding the perfect backpack:
* Before shopping, decide which features are important and which you (or your child) can
live without. Is a mesh water bottle holder a must-have? Can you live without a CD holder
and earphone hole? Do you prefer sling backpacks or traditional backpacks?
* When shopping for a backpack, look at the compartments and think about how they will be
used. Will multiple outside storage compartments make it easier to find items? Is a front
pocket organizer the perfect place to keep often-used items?
* Always go for quality construction. If it's going to be worn as a backpack, look for
padded shoulder straps - especially if heavy books will be lugged around. A reinforced
handle is also an indicator of quality construction. Make sure that the backpack is made
from superior materials and has reinforced double stitching and strong, non-rusting
zippers.
* Buy backpacks that are guaranteed. There's nothing more frustrating than investing in a
backpack, only to have it tear or fall apart in a month or two. Find a company or an
online store offer a money-back guarantee for their products.
Backpacks, duffel bags, daypacks, and hiking packs are definitely practical, but they can
also be cool accessories. Indulge your whimsy, but keep an eye on quality.
If you are looking for an outdoor sporting activity, camping is one and the other is
hiking. Though Camping may not be considered a "sport" by many outdoor activity
enthusiasts, it is a good way to get away from the madding crowd for a few days at least.
If your intention is to get away into the wilderness and be one with nature for some
time, camping is the choice to make. Though the only exercise you will be getting is from
walking and carrying your backpack on your shoulders, camping can prove to be a great
pastime to rejuvenate your energy. Hiking, on the contrary is more of an exercise because
walking and trekking is a major part and parcel of the deal. So whichever of the two you
may choose, you will need good quality equipment to keep you from missing the luxury of
your apartment back home.
When you have finally decided on the kind of camping or hiking gear you will be using
it is a good idea to take some time to analyze the whole outfit, this will help you in
deciding the size of the backpack you need to get.
You will also need to take into consideration the weight of the backpack you will be
comfortable carrying, considering you will be lugging it around for hours on end. You do
not want to tire yourself out at short intervals because your goal is to get some
exercise, and so you do not want to take frequent breaks from walking.
A heavy and cumbersome backpack will ruin your fun on your adventure. Adjustable
shoulder backpacks are the most common and recommended as these can be adjusted to fit
snugly on your shoulders without the biting or pinching around the waist or shoulders that
lead to annoyance and difficulty while hiking or trekking.
Some hiking and camping backpacks have integrated aluminum frames designed to add
support to the back by giving the backpack a definite shape. The weight the frames add to
the backpack is negligible because of the hollow nature of the structure. The design of
the frame is to evenly disperse the weight of the pack and the external bar of the frame
concentrates the weight closer around center of gravity of the body, the hip region of the
hiker.
Most of the hiking and camping backpacks have side pockets made out of the material the
whole backpack is constructed out of; some backpacks have these pockets made out of wire
mesh or more durable material. These external mesh pockets are not waterproof most of the
time so be careful what you store in them. While choosing your backpack ensures that the
pockets are waterproof and easily accessible. The backpack must also have large pockets to
store clean and dirty linen separately. It should also have additional compartments that
allow the hiker to organize his or her hiking gear in a way that is easy to access.
Once you have made a good choice in your backpack you can be assured of hours of fun on
many of natures adventure trails.
Abhishek is a Camping freak! Visit his website http://www.Camping-Guru.com
and download his FREE Camping Report "Camping With The Family: How To Have A Safe,
Fun, And Inexpensive Vacation" and learn some amazing Camping tips and tricks for
FREE. Learn how to have the perfect vacation on a shoe-string budget. But hurry, only
limited Free copies available! http://www.Camping-Guru.com
On beaches that are patrolled by lifeguards, flags are used to warn about
water conditions. Red flags indicate hazards such as currents or strong winds. Adult
swimmers should not not go further than waist deep water. Non-swimmers, children and the
elderly should be kept at the surf line. Red and Yellow flags indicate the safest areas to
swim. The red in the flag is a reminder that all swimming should be done with care.
A rip is a strong current running out to sea. A rip current usually
occurs when a channel forms between the shore and a sandbar and large waves have built up
water which then returns to sea, causing a drag effect. The larger the surf, the stronger
the rip. Rips are dangerous as they can carry a weak or tired swimmer out into deep water.
Rip currents are found on some of the beaches around Trinidad,
particularly on the East coast. When on the beach you can usually identify the presence of
a rip current by looking for the following features:
murky brown water caused by sand stirred up off the bottom with the water flowing out to
the open sea. Sometimes this looks like a river in the ocean.
a rippled look in a particular area of the water, when the water around is generally
calm
darker colour than the surrounding water, indicating deeper water
debris floating out to sea, all in one specific area
smoother surface with much smaller waves, alongside white water (broken waves)
If you are caught in a rip current, take the following actions to escape the current:
Don't Panic - stay calm
If you are a strong swimmer, swim at a 45 degree angle across the rip and in the same
direction as the current until you reach the breaking wave zone, then return to shore
If you are a weak or tired swimmer, float with the current, don't fight it. Swim
parallel to the shore for about 30 - 40m until you reach the breaking wave zone, then swim
back to shore or signal for help.
Water and Alcohol do not mix, when it comes to swimming. A raised blood
alcohol level affects judgement and makes an individual more likely to take greater risks,
while at the same time affect the individual's ability to respond to a potentially
dangerous situation. A swimmer who has been drinking alcohol tires more easily and is less
capable of swimming. Swimmers who have been drinking alcohol and get into difficulty are
also more likely to vomit and inhale the stomach contents into their lungs.
Body surfing is riding waves without any equipment. This is an enjoyable activity for
all ages at the beach. Body Surfing requires the skill of catching the wave at the right
time and using its energy for propulsion. Here are the techniques for good body surfing.
As the wave is almost upon you, push off the bottom or start swimming toward shore until
you feel the wave begin to lift and carry you.
As the wave breaks, take a breath, put your head down and kick hard until your body
breaks through. Your feet should be together, your back arched slightly and your arms
extended in front of you. As the wave becomes steeper, tilt forward and surf along the
wave's face.
You will probably have to paddle a bit to hold your position on the wave. Try to keep
your body straight.
As you approach the beach, pull out of the wave by turning your body away from the
wave's breaking force, or jackknife dive and let the wave pass over your body.
Before entering the surf, always make note of a landmark such as a building or headland
that can be seen from the water and used as a guide for maintaining a fixed position. Also
check the depth of any gutter and the height of any sandbank before diving under waves
– this will help prevent spinal injury.
When going out through the surf, negotiate the shallows by a high hurdle type of stride
until the breakers reach your waist or until your progress is slowed.
Waves of any size and force should not be fought against and should be negotiated by
diving underneath, giving you time to reach the bottom and lie as flat as possible on the
sand while the wave passes over.
Your hands can be dug into the sand in front at arm's length for stability and as a
pull forward when ready to surface.
If the water is deep enough, bring your knees up under your body so you can get a good
push off the bottom, like an uncoiling spring. This gives added force to your next dive.
Repeat this process until in chest-deep water, then start swimming.
If a broken wave approaches when the water is not too deep, dive down and run or crawl
along the bottom. In deep water, do not use extra energy trying to reach the bottom;
instead duckdive to just below the turbulence. Wait for the wash to pass and then push or
kick to the surface (off the bottom, if possible).
Stick to your predetermined path on the swim out.
Check your position by occasionally raising your head for a quick look when swimming on
top of a swell.
To give added support thus reducing saggy
breasts or breast pain or movement of the breasts when exercising women should always wear
a well-fitting sports bra. The dub sports bra can be used for the following actives Weight
training, Yoga, Spinning, Running or Aerobics.
The difficult question is, which sports bra should I wear?
Sports bras are usually manufactured in one of two types, the traditional style of
bra with cups that lift and separate giving shape and form. There are various makes of
sports bra on the market and ours is a specialist sports bra. Our dub shock absorber
padded sports bra with its double lined system and adjustable straps and soft breathable
fabric gives you freedom of movement and keeps you dry longer. A great running bra; Made
of 91% Cotton and 9% Elastane, for added support.
A good fit is essential, firm and supportive but no so tight that it restricts
breathing. Although you can measure your bust to establish your size and cup size, it is
worth remembering that sizes are not industry standard and each manufacturer's sizes can
vary from each other. So it is important to select your bra from a specialist company like
ourselves who will exchange it free of charge if the size is not right.
In recent years our sports bras have benefited from the advance in high performance
fabrics that take moisture away from the skin and keep you dryer and cooler in your
workout. Fabrics such as Polyamide, which has a unique fibre construction, helps to keep
you cool and dry during your workouts. Mery Actisystem is a fabric which maintains the
natural balance of the skin as it is highly breathable and possess excellent moisture
management properties which helps to eliminate bacterial build up. Supplex® is a super
knitted soft nylon yarn that resembles cotton. Made by DuPont, Supplex® enables quick
drying, up to 40% faster than cotton. It is abrasion resistant to minimise pilling, retain
shape and is easy to look after, being wash & wear and crease resistant.
So when you purchase our sports bra you will be wearing a good comfortable piece of
kit, that will in the long run keep you looking and performing better.
fitnesssportsstore.com
Fitness wear sports store specialise in womens sports clothing, that are suited for all
sports fitness actives such as a spinning, aerobics, pilates, gym, yoga, running,
swimming. Top brands, buy online today wear tomorrow.
About the Author
Fitness sports store has been supplying the UK fitness industry with quality goods,
value for money for twenty years.
When most people decide to get into a fitness regimen, they are happy
enough with themselves just because they got themselves to the gym or motivated themselves
enough to workout at home. While that's a start, it's good to eventually focus on what
they are wearing. Fitness apparel is a pivotal part of your workout. It's not about vanity
or fashion! It's about performance.
You would wear a ball gown to a ball, you would wear nice clothes to a fine dining
restaurant. You wear casual clothes to a movie. So, why dress like we don't care when we
are working out. If our health is a priority, then you should take it more seriously than
any social outing.
When you wear baggy (ill fitting) clothes, cotton, or something that has seen it's better
days you will not perform as well because (A) You can't move well and (B) Believe it or
not, you are psychologically affected by what you wear. Have you ever noticed how what you
wear affects your mood? If you are uncomfortable it will show and negatively affect you.
Your focus will keep going back to your clothes and why should you be focusing on your
clothes when you are supposed to be exercising?
When you are comfortable and have on the right workout clothes, your mind is where it
should be, on your workout. You aren't soaking with sweat, your clothes aren't in your way
and you aren't having to worry about something riding up.
Some tips for women:
Stay away from baggy clothes. They aren't flattering and can make you
look fat where you aren't fat. They also can be difficult to move in.
Steer clear of cotton. It's just a bad material. Cotton shrinks,
stretches and is not 'dry-wicking', meaning that when you sweat, you will just be soaked.
Feel comfortable in sports bras, but be classy. We know that you have
breasts, but it's not the time to show them off.
Ladies, when you have a bigger rear end, it does no good to tie a t-shirt
around your waist and cover it up. You aren't fooling anyone. If anything, you are just
making it more obvious. There is a psychological thing that happens-if you can see the
problem, you will be more conscious of it and you will have to do something about it.
i.e.-Got a big butt? Do some lower body sculpting and cardio. You need to lose fat and
sculpt the area. How can you do that, if you just pretend the problem is not there? If you
will wear something that's not baggy, but also not tight, it will help.
Men and women are different but men should also wear the right workout clothing. I know
guys-you aren't going to put on the tight spandex, but you still need to be comfortable.
Here are some tips:
I seem to notice that some men think that because they have their cool
workout clothes on, they are getting a good workout. I can put on a soccer uniform, but
that doesn't make me a soccer pro.
Most of the guys that I know who have been working out for a while (and
have the results to prove it) wear something like Nike or Puma shorts (some kind of
athletic wear) and either a 'dri-fit' shirt or just a comfy cotton shirt. Some guys just
feel not too manly in Under Armor and that is their right.
Men and women should stick to workout apparel that is comfortable and
lasts. Cheap clothes are cheap clothes. Don't get your workout clothing at Target. This is
not an issue of taste. Nike, Adidas and Puma clothes last longer and fit better. There is
a reason that athletes promote them and they are more expensive. Focus on fit,
functionality, material and looks.
Always go with 'Dri-fit'. It literally wicks moisture from your body. Instead of being a
sweaty mess, you will be dry because your clothes will pull the moisture away from your
body.
Workout apparel is all over the Net and you may have some stores in your city. But, if you
don't, do not fear-Anyone who knows anything about shopping, knows to shop Online. Even
though you have to pay shipping, you will have thousands of choices. Try for 'free
shipping' deals.
Learn why [http://mybesthealthandfitness.com/Nike.html/]Nike Clothing Rocks and why
[http://mybesthealthandfitness.com/Puma.html/]Puma Shoes Perform.
Julie Russell is a fitness & nutrition enthusiast, who is constantly expanding her
knowledge regarding strength training and maintaining a healthy diet. Visit her website at
www.MyBestHealthandFitness.com.
You'll find lots of free fitness and nutrition tips as well as reviews of the best fitness
and nutrition products Online.
Mosquito control when backpacking isn't a minor issue. At one time mosquitoes were a
nuisance more than anything. If you backpacked and camped in areas that had a lot of these
pesky insects, you expected to be bothered. You expected to lose sleep even. But now
mosquitoes in many areas of the United States also carry diseases that are potentially
deadly. You need to be prepared.
Mosquito control, then, is important, and starts with a little planning before the trip.
For example, bring a mosquito head net if you will be in an area with a lot of mosquitoes.
The lightest ones are about one ounce - light enough even for those of us who like to go
really light. What else can you do to avoid mosquitoes or prevent their bites? Here are a
few tips.
1. Always carry insect repellent with DEET in it. Others may work okay, but so far DEET
has the best record for repelling mosquitoes and preventing bites. It does cause damage to
nylon and other synthetic materials, however, so be careful to apply it to your skin,
without getting any on that rain jacket or those synthetic shirts or pants.
2. Wear neutral colors. Mosquitoes seem to be attracted to blue and to contrasts of light
and dark clothing. Stick to tan, light brown and beige colors as much as possible.
3. Cover your skin. Tuck pants into your socks and wear long-sleeved shirts in areas that
have a lot of mosquitoes. Generally, they'll have a hard time biting through nylon
materials that are tightly woven. Avoid fishnet t-shirts and other easy-to-bite-through
shirts.
4. Set up camp in breezy locations. Set up camp in areas that get a breeze and you'll have
a lot fewer problems with mosquitoes. Face your tent into the wind and you'll avoid
allowing insects inside when you climb in and out.
5. Timing matters. Mosquitoes are more active at dawn and dusk, so avoid them by setting
up camp before dusk and leaving by dawn.
6. Keep clean. Personal hygiene is an important part of mosquito control. Mosquitoes and
other insects are drawn to the ammonia in your sweat, and the odor of your feet. Wash
yourself regularly (in lakes and streams if necessary) and you'll attract fewer bugs.
7. Use fire. A small fire that produces a fair amount of smoke will keep many insects
away. Use a few live branches from spruce or fir trees to produce more strongly scented
smoke.
I have hike and camped from the
Sahara desert in Libya to the Canadian mountain wilds. A very important consideration
before any outdoor camping or hiking trip is safety. The most effective way to prevent
mishaps and stay out of danger is to adequately prepare for the trip. Knowledge of the
area, weather, terrain, limitations of your body, plus a little common sense, can help
make your camping or hiking trip enjoyable and safe.
Following are twelve proven hiking and camping tips based on my many experiences in the
wild:
Buddy Travel Leave a copy of your itinerary with a responsible person. Include
such details as the make, year, and license plate of your car, the equipment you're
bringing, the weather you've anticipated, and when you plan to return. You don't want to
be by yourself in case of an emergency. If you'll be entering a remote area, your group
should have a minimum of four people; this way, if one is hurt, another can stay with the
victim while two go for help. If you'll be going into an area that is unfamiliar to you,
take along someone who knows the area. Or at the very least speak with those who do before
you set out. If an area is closed, do not go there. Know ahead of time the location of the
nearest telephone or ranger station in case an emergency does occur on your trip. If cell
phone reception seems possible, take along your phone.
Do Your Sit Ups. Get in good physical condition first and then set a comfortable
pace as you hike. If you have any medical conditions, discuss your plans with your health
care provider and get approval before departing. A group trip should be designed for the
weakest member of the group. Make sure you have the skills you need for your camping or
hiking adventure. You may need to know how to read a compass, erect a temporary shelter,
or give first aid. Practice your skills in advance. If your trip will be strenuous, get
into good physical condition before setting out. If you plan to climb or travel to high
altitude.
Keep Your Footing. This is important not only near cliffs, but in all area with
slopes and loose surfaces. Trees and bushes can not always be trusted to hold you. Stay on
developed trails or dry, solid rock areas with good footing.
When Climbing Up, Going Down May be Twice as Tough. I once got trapped on a
small beachside cliff in north Africa near Tripoli as a Boy Scout. A Scout leader had to
rescue me. Climbing up was easy, as I remember it, but getting turned around for the
descent seemed impossible.
Wear the Right Clothing for the trail conditions and season. I once hiked on the
Appalachian Trail in Virginia on what started as a beautiful fall day. But halfway up to
the camp area an ice storm hit. I was NOT prepared with proper clothing and it was a
miserable experience.
Check Your Gear. Keep your equipment in good working order. Inspect it before
your trip. Do not wait until you are at the trail. Be sure to pack emergency signaling
devices.
Watch the Weather. Keep an eye on current and predicted weather conditions. In
this area, weather can change very quickly. Know the signs for approaching storms or
changing weather conditions. Avoid bare ridge tops, exposed places, lone trees, streams,
and rocks during lightning storms. Find shelter in a densely forested area at a lower
elevation. Even in the summer, exposure to wind and rain can result in hypothermia.
Master Basic First Aid so you will know how to recognize and at least partially
treat injuries and illnesses. Carry a first aid kit with you. Learn how to identify the
symptoms of heat exhaustion, heat stroke, hypothermia, and dehydration, and know how to
treat them.
Stop Way Before Dark and Make Camp. Traveling after darkness has resulted in
many accidents from trips and falls. Travel only during daylight. Set up camp well away
from the edge of cliffs, and learn the terrain during daylight. If you have to leave camp
after dark, stay in areas you have seen in daylight, go with a friend, and always use a
good flashlight.
Take It Easy and take your time to avoid tripping. Low-hanging branches and
variable terrains make running unsafe, and leaves can hide slippery areas underneath. I
used to train for the National Ski Patrol in North Carolina by running up and down
mountain trails, but this is the rare exception.
Alcohol and Hiking Never Mix. If you drink, stay away from the trails and
particularly the cliffs. Judgment, agility, and balance are all compromised by alcohol
consumption.
Think Before You Drink the Water. Yes, it may look great. But no matter how
clean or pure stream water looks, it's likely to contain water-borne parasites and
microorganisms. These unwelcome critters can cause discomfort and sometimes serious
illness. Pack your water in, boil it, or purify it through chemical treatment.
Follow these simple suggestions and then just get out there and go for it!
E.
Lee Reid is a hospitality, travel and leisure, vacation real estate, and construction
industry expert. In recent years he converted several hotels to condo hotels in the Disney
World area of Central Florida. His published articles on the outdoors have appeared in
Field & Stream, National Fisherman, Florida Sportsman, and numerous others. He is a
widely quoted author and speaker. Reid is a former Emergency Medical Technician (EMT) and
member of the National Ski Patrol. Visit Lee at http://www.eleereid.com
or http://www.reid4florida.com or http://www.edisneytimeshare.com
Sandals are ideal footwear for outdoor activities because they
offer protection for your feet, allow your feet to breathe, and are generally comfortable.
Outdoor sport activities offer an array of activities, such as golf, walking, and rafting
with different requirements for your feet. It is a good idea to choose a style of sandal
that is suitable for the type of outdoor activities you perform on a regular basis.
Walking
Walking was probably man's first indoor and outdoor activity. Flip flop sandals are a
good choice when you don't require a significant amount of support. High heel sandals are
typically not recommended for long walks because your feet are in an unnatural position,
which over time can cause stress and injury. According to Dr. Scholls, well-known makers
of foot care products, if you must wear high heels it is best to opt for those that offer
ample space for your toes and that are considered "walking" or
"performance". Aerosoles and Dansko are just a couple of comfort shoe brands
that offer high heel sandals that work well for walkers.
Water Sports
Fisherman sandals are a casual style for both men and women. The name is a bit of a
misnomer, since this style doesn't refer to fishing. However, these sandals are perfect
for water sports since they are made to allow water to flow through and beyond the feet; a
feature that is particularly recommended for foot health. The soles on fisherman sandals
tend to be thicker than average and are very comfortable.
Slide sandals and flip flops are not suitable for high activity water sports, such as
rafting, by virtue of their easy on-off design. A better sandal style for rafting is one
with an ankle strap that secures the shoes on the feet.
Hiking
In general, sandals that are appropriate for long walking trips are fine for hiking.
The exception is if you plan to hike up very hilly areas. In this case you will require
sandals with more ankle and foot support. Sandals for hiking also usually have an
adjustable strap for added protection. When shopping for sports sandals that you can wear
while hiking, look for thick soles, adequate ankle support, and toughness.
The Beach
Appropriate beach sandals are obviously waterproof with a sole that is usually made of
rubber or other flexible material that provides great traction. Beach sandals are
typically available in a variety of lively colors. Flip flop sandals are the most common
footwear of choice for the beach.
If you participate in a variety of activities, a multi-sport sandal that offers
qualities of various sandals is recommended.
Developing rust on a knife after only a week can be a very frustrating occurrence. Believe
it or not, rust can and will develop in such a short period of time even on a stainless
steel knife! In this article I will share with the reader some of the best practices for
knife owners to use on a daily basis to prevent rust and corrosion.
Knives that are made from high carbon steel are typically harder than stainless steel and
will stay sharp for a considerably longer period of time. The high carbon content gives
knifes this ability but also makes it much more prone to rust. Many hunters prefer to have
a knife made from high carbon steel because of the fact that they hold their edge longer
than a stainless steel knife and they require less sharpening. It is important to remember
to clean and dry the blade of your knife (high carbon or stainless) very thoroughly
immediately after skinning an animal. Leaving blood or moisture on the blade of your knife
will cause rust and/or permanent staining that is not only less appealing to the eye, but
can spread like a disease throughout the knife and eventually ruin it. It is also
important that your knife is dry before you put it away in your sheath or knife holder.
Many knife owners' first instinct when they are finished using their knife is to store it
in the sheath. It is made to hold the knife after all, right? The truth of the matter is
that leaving your knife in its sheath for long periods of time will most likely cause it
to rust. This is because moisture develops inside the sheath and sits on the knife blade
for a period of time and causes corrosion.
A helpful way to prevent rust from forming on your favorite high carbon knifes is to apply
a light coat of non-detergent based oil to the blade. Your local hardware store should be
able to help you with your selection. Some knife owners use vegetable oil on their blades
but I would not recommend this practice as it can eventually ferment. I suggest either
using 3-in-1 oil or most gun oils when it comes to lubricating your high carbon knife.
Again, be sure to select something that does not have any acid or other substance that
could eat away at your blade.
Keep in mind that some knife sheaths have steel or other metal on them that can rust as
well! I recommend using the same oil and rust prevention techniques with these parts of
your sheaths as you do with your knife.
About the Author
Santiago Gutierrez is a lifelong hunter, fisherman and knife collector.
If an emergency occurs and someone is in distress, professional divers, firemen and
rescue works must respond to the challenge immediately. Waiting for ideal weather
conditions or better lighting is not an option when lives are at stake and the potential
for destruction is high. It is no wonder that these professionals demand the highest
quality in their lighting equipment. Their flashlight must be strong. It must be bright.
It must be easy to use. And for many it must also have air-tight construction that leaves
the device water resistant.
A water resistant LED torch can cut through the clouds and rain of a thunderstorm,
illuminate a darkened street at the scene of a vehicle accident, and accompany a rescue
diver searching for wreckage and survivors under water. These lights have proven their
worth to many rescue professionals because of their strong, bright light, and long life.
While few of us will encounter the harsh conditions that professional rescue
professionals must, we can take much from their experience and apply it to our own needs.
Professionals demand a certain level of reliability and quality for all of their
equipment.
Professionals as a whole tend to prefer the inherent characteristics of an LED light
source. These flashlights burn much longer than a traditional flashlight. They also give
off a higher lumens output than many traditional flashlights. This means the brightness is
intense enough and clear enough to cut through the darkest areas. LED bulbs are also more
durable than incandescent or halogen bulbs, making them ideal for extreme situations like
fires, rescues and even the military.
There are of course adventurers out there that do consider diving, treasure hunting or
snorkeling a vacation pass time. These individuals tend to consider LED flashlights the
superior option and water-resistance a necessary feature. The strength of an LED torch
made for underwater use cannot be beat when it comes to illumination.
The everyday home owner or outdoorsmen may not immediately consider the importance of a
water resistant flashlight. You do not have to take your torch diving to 60 meters below
to benefit from water resistance. If you are in the rain on the side of the road changing
your tire or caught camping in the rain for a weekend, it is nice to know that your
flashlight can handle the weather. Having these lights can prove very beneficial in your
home emergency kit as well. Should rising water, broken pipes, a power outage or other
unforeseen problem occur while you are at home, water can become a significant danger.
Water-resistant equipment can give you and your family the assurance that you can weather
through the problem.
Professional divers and rescue workers have known for a while the value of these
lights. With the long lifespan and durability that a LED torch provides, people that use
flashlights know they make an excellent choice. Campers, hunters and fisherman have
understood for a while that a sturdy water-resistant LED flashlight is a key component of
many outdoorsmen's gear.
~Ben Anton, 2008
Ben Anton lives in Portland, OR and writes for DLK.
We invite you to read more about the benefits of water-resistant LED flashlights at our
tactical LED lights and outdoor equipment website.
Waterproof, windproof, and breathable clothing is an innovation no one should be without,
especially out in the rain. When rain gear is made out of squaltex fabric you do not have
to worry about those scratching sounds when you walk or rub up against a bush or a tree.
There are a lot of innovations that stick out in the mind of hunters and fisherman
everywhere such as a cartridge-firing gun, mono-filament, and camouflage. There is one
that has earned its name in the last decade that will change the outdoor sports forever,
which is breathable rain gear. This rain gear is completely waterproof, windproof, and
breathable clothing that can be found many places and at many costs. Unfortunately, some
are priced like a new BMW and other stuff could be traded for a pile of hubcaps, but the
quality and durability can come into question with many of the less-expensive brands, and
the more costly outfits leave you wondering if they are stitched together with gold
thread.
Squaltex rain gear is designed with the hunter in mind with the outer layer of fabric is
supple to the touch. The soft feel makes the garment quiet in the field. The outer layer
of fabric does not collect many hitchhiking plants. Burrs and seeds of clinging plants do
not adhere well to the surface and do not collect in large numbers. The inner layer of the
garment is designed to aid in the fabric's breath ability, while the liner is constructed
of a nylon mesh. The mesh does not hold moisture and feels good next to the skin if worn
in warm weather over something light like a t-shirt. Of course, the rain gear is
invaluable at holding heat in during cold weather since it does not permit air to blow
through.
The waterproof, windproof and breathable attributes come from the fabric's design that
technology has allowed the development of "super fabrics" in modern times.
Science has done its best to outfit the outdoorsman with technical clothing that blocks
out Mother Nature's worst. The cloth is really a sandwich of layers and each layer does
something for the suit, but it is the center layer of the sandwich that is the workhorse.
That layer is the membrane, which allows moisture and air to pass in only one direction
and acts as a shield for your body as it resists wind and rain. The benefit of rain
protection doesn't need explaining, because everyone knows how important staying dry is,
but there is something to be said for convenience and comfort, too.
Not every time you get wet are the conditions harsh enough to put your health at risk, but
sometimes it is just worth it to stay dry and comfy. Breath ability is the most noteworthy
aspect of rain gear and what makes it extraordinary. Perspiration is the enemy of most
rain gear and when rain gear is not breathable, then it holds moisture, in the form of
sweat, inside the garment instead of allowing it to pass through the membrane. That
moisture resides in the clothing next to the skin and when the undergarments get wet, then
they tend to have less insulation value and in cold weather, you do not want that to
happen.
About the Author
Victor Epand is an expert consultant for sweatpants, sweatshirts, outdoor gear, sports
clothing, and model motorcycles. Click here when you want to find sweatpants, sweatshirts,
rain gear, and model motorcycles.
Every year in the Caribbean from Christmas onwards and especially as Easter approaches
the sky becomes filled with kites of every shape and colour. The strong constantly blowing
Trade Winds at this time of year encourage the flying of kites. On most islands there is
at least one kite flying competition and some islands such as Curacao have several
competitions. In bygone years almost every little boy knew how to make a kite, often
surreptitiously taking his mother’s old sheets for the kite tail. While the parents
might act annoyed at the loss of the sheet, secretly they did not object because the
making of the kite kept their children occupied and then there were the hours of fun in
actually flying the kite.
Nowadays however the skies are filled with kites that have been made in factories and
sold on street corners. It seems as if the art of kite making is slowly dying and yet some
types of kites are simple to make. This article will show you the steps to making one
simple type of kite, the Diamond Kite.
To make a kite there are certain items that you will need and it is best to have them
at the start rather than begin and have to stop to search for an item. The basic
requirements are:
Two thin strong straight pieces of wood, at least 24 inches each. You can use wooden
dowels or bamboo or the spine of thick coconut fronds
A sheet of stiff strong paper (102 cm by 102 cm)
Glue and Scotch Tape
Strong thread, string or twine
Ribbons or strips of cloth
Scissors and a knife
A ruler or measuring tape
Now for the steps in making the kite:
Cut one length of wood at 24 inches and cut the other length of wood at 16 inches.
Place a mark in the middle of the shorter piece and place a mark on the longer piece at
one third it’s length (8 inches)
Place the two lengths of wood on each other in the shape of a cross. You should place
them so that the two marks are touching. The horizontal piece will therefore be one third
of the way down the vertical piece and have an equal distance on either side.
Join the two lengths of wood by tightly tying some string. It is easier to use wood glue
to keep the two pieces together. If you use glue you should allow some time for the glue
to bond the two pieces of wood.
Cut a small notch in the ends of both pieces of wood.
Take a length of string and tie it at the top of the frame and then pass it through the
notches to make a diamond frame. When you reach back to the top with the string tie it
securely. The string creating the frame must be taught but not so taut that it would bend
the wood. The string should be in the notch so that a small piece of the wood protrudes
beyond the string (this small piece will be used for creating the bow later).
Place the paper of a flat dry surface and then place the kite frame on top of the paper.
Cut the paper in a diamond shape about ˝ inch (2cm – 3cm) wider than the shape
formed by the string.
Fold the edges of the paper over the string and tape the paper in place. Make sure that
the paper is tight against the frame. You can also glue the paper in place. If using glue
allow a few minutes for the glue to bond the paper in place.
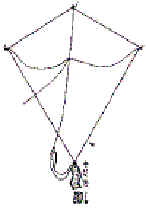
Take a length of string and tie it to the top and bottom of the vertical piece of wood
(the small piece of wood that protrudes beyond the frame). Take another length of string
and tie it to the horizontal piece of wood. Both pieces of string should be slightly
longer than the pieces of wood.
Pick up both pieces of string with a finger and find the point where they overlap or
intersect. At the intersection join the two pieces of string by tying them with another
piece of string. In tying this third piece of string you can leave a little loop as this
is where you will attach your kite line. This point where you attach your kite line is
known as the pivot point or bow or brindle.
Make a tail for you kite using thin strips of cloth. If you can still find typewriter
ribbon, it makes an excellent kite tail. Attach the tail to the bottom of the kite.
You are now ready to find an open area with a steady breeze to go fly your kite.
In
every part of the Caribbean, whether Bermuda, Trinidad, Guyana, Barbdos or Grenada, there
is a particular shape of kite that always generates excitement and causes everyone to stop
and stare at the sky. These particular kites are known as Bulls or Mad Bulls because
the sound they make can be quite loud and threatening. The "bull" is a flap of
paper attached to the kite so that it flaps in the wind and makes the kites buzz or
"sing". Mad Bull Kites vary in size from six inches to over 20 feet. On Easter
Monday in Trinidad there is a Kite Flying competition in the Queen's Park Savannah in Port
of Spain, where very large Mad Bulls can be seen, some so large that it takes up to 6
persons to get the kite aloft and then may require tying the rope to a truck body to keep
the kite from drifting away. You can see some of these kites at the Outdoors Trinidad
Photo Gallery in the Kite Section.
In other islands the kite flying day varies; in Bermuda it is Good Friday, in Barbados and
Guyana it is Easter Monday.
The Bull Kite is a hexagonal shape with the framework made of
light wood or bamboo. After the framework is created the outer frame of the kite is made
using string or in the case of the larger Mad Bulls, light rope. At the top of the kite a
piece of curved bamboo or wire is used to cause the top to curve forward. Over the frame,
multi-coloured paper is placed. For the very large kites, a stiff paper is placed over the
frame to withstand the force of the wind and then the lighter multi-coloured paper is
placed over the stiff paper.
The
bridle used on these kites is a three point bridle with the top two points attached to the
top two corners of the kite and the third point attached to the center of the kite. At the
brindle (meeting point of the three strings) the string or rope that is used to control
the kite is attached. For Mad Bull Kites, a long tail is attached to the bottom of the
kite. The tail has a 20 to 1 ratio to the length of the kite and is attached to a line
that hangs from the lower two points of the hexagon. The tail material is usually made
from strips of cotton fabric torn up and tied in knots to form the lengths needed. For
larger kites, two tails are used and for a very big kite three or four tails are used.
Bacteria build-up in any hydration
backpack can be dangerous if allowed to breed. If you are filling your hydration backpack
with sugary sports drinks, the chance of bacteria growth is even greater. Hydration pack
cleaning kits can be purchased and include a long wire with a brush attached and
sterilization tablets that, when placed in water, create a cleaning solution.
While rinsing your Camelbak hydration bladder with hot water and allowing it to dry
completely after each use is important in order to extend the life of the bag, you do need
to clean it occasionally with a sterilization solution. When you purchase your
hydration pack, buy a Camelbak cleaning brush and kit with it. It will pay dividends
in the long run.
6 Steps to Cleaning and Deodorizing:
Create a sterilized solution by placing the sterilization tablets in water and allowing
them to dissolve.
Remove the mouthpiece from the tube and soak it in the sterilization solution.
To clean the tube, insert the wire into one end of the tube and pull it through to
clean. Repeat if needed.
Soak the mouthpiece and hydration bladder in the sterilization solution.
Rinse and hang the bladder upside down to dry.
Most of the actual backpacks can be washed in your washing machine. Make sure to follow
the washing instructions.
Taking the time to rinse and dry your hydration backpack after each use which will cut
down on how often you must sterilize it. Keep a look out for mold and mildew growth and
sterilize as soon as possible to keep your hydration backpack clean and yourself healthy.
About the Author
As an avid extreme enthusiast, I know the value of a high-quality hydration backpack.
While Camelbak hydration packs are top of the line, there are several other great models
and choices. For great information and articles on hydration and outdoor activities visit
our site at http://www.besthydrationbackpacks.com
Doug and Judy Kramer are parents of six of their own kids. They are
full-time parents and in their spare time they are cultural architects, youth and young
adult relationship builders, writers, web innovators, speakers and friends to many.
1. How will you be using your new sneakers? Are they for casual wear when you're
out running errands, recreational sports or serious fitness training? Will you be running,
jogging, weight lifting, playing tennis, or taking aerobic classes?
2. Consider your arches. More than the ball, heel or instep, your arches will
determine the type of sneaker you will be most comfortable in. People with 'high arches'
should make shock absorption and lateral support a priority while low arches require more
overall and heel support.
3. Feet normally swell from walking and standing, so it's a good idea to shop
for sneakers later in the day when they will be slightly larger.
4. Sock thickness can add one half size. Remember to bring the kind of socks you
will be wearing with your sneakers when you try them on.
5. Have both feet measured for length and width by a knowledgeable sales person.
Feet tend to widen as we age, especially in women who have had children.
6. Today's technology and high tech materials make a break in period a thing of
the past. If the sneakers aren't a perfect fit from the get go, pass and keep looking.
7. Feet are rarely exactly alike. One foot is almost always larger (wider) than
another. Buy your sneakers for the larger foot. Allow a finger's width between the shoe
and your big toe.
8. New sneakers' ability to absorb shock will break down at about 450 miles or
between 3-6 months of consistent use; whichever comes first. Waiting too long can make you
susceptible to back, hip, knee or ankle pain and possibly injury.
9. Always buy two pairs. Alternating pairs every other day gives sneakers time
to dry out thoroughly. Also, use your workout sneakers exclusively for fitness activity.
They will last much longer if you don't wear them all day.
10. Get your feet evaluated by a doctor, podiatrist or qualified physical
therapist for any preexisting conditions. You might need special custom inserts called
orthotics.
Bonus Tip: You might save some money buy finding what you want at a regular
retail store and then shopping for it at an outlet store, liquidation sale or even online.
Are you ready to get more great useful information about fitness? If so
then I invite you to http://www.mysfitness.com
to get more great free information about exercise and fitness.
So we are now in the 21st century. We say good-bye to
those times when the image of a woman is portrayed as being limited to the four corners of
her home (although, of course, nothing is wrong about staying at home and doing the
household chores). Well the point is more and more women engage in outdoor activities such
as climbing, skiing, and so on. And, among the things that they must have are ladies
waterproof jackets.
I just cannot imagine going outdoors without my waterproof jacket. Just thinking of
those days and nights outdoors with heavy rains or light snowfall without the proper
article of clothing on makes me sneeze or shiver. Of course, you would need a waterproof
jacket to protect you from the elements outdoors: wind, rain, snow - these are just some
of the elements that you have to protect yourself from when you are out there in the open.
Otherwise, you will not have as much fun in your activities, or worse, your health will be
at risk.
There are different kinds of waterproof jackets that you can choose from, and it would
not hurt to carefully choose the ones you think would best suit your needs; apparently,
there are also men's waterproof jackets available. Moreover, while functionality should be
your primary consideration, it would also not hurt if you take style into consideration;
especially the one that you think best reflects your personality. Hop from one store
(whether your local store or an online store) to another, take a look at the quality of
their waterproof jackets, compare prices, and do not be surprised to find out that you got
the best jacket for you at a reasonable price.
Now what does an ideal waterproof jacket made of? Well, it must be made of a waterproof
fabric that is "breathable". To make a waterproof fabric breathable, tiny pores
are incorporated into the material. What breathable waterproof fabrics do is that they
make it possible for your sweat to be transferred from the inside of your jacket to the
outside, allowing your sweat to evaporate. In effect, you getting hot and wet when active
is prevented.
But you also have to realize that the lightness or heaviness of a waterproof jacket
depends on where you are going to use it for. For instance, waterproof jackets that are
lightweight are usually used for general hiking and fun outings. On the other hand,
heavier waterproof jackets are designed for those hill walkers who need utmost protection
from the harsh conditions on the mountains.
Jackets, in general, have proven to be useful not only for a specific activity or a
period of time. It is safe to say that they are basic necessities when it comes to
clothing articles. They vary in styles and brands, examples of which include the ladies
Berghaus jackets.
Indeed, it is obvious that women participate in more and more outdoor activities, even
those physically strenuous ones. And, if you are one of those women who just love the
outdoors, you cannot afford not to have the basic necessities that the outdoor life
requires. Now if you are just starting to widen your horizon and explore the fun and
relaxation brought about by staying away from the city and be with nature once in a while,
then you can start your journey by having the best ladies waterproof jacket that you can
get. While you may want to be a bit more adventurous and make your backpack as light as
possible, you would want to have some protection while you are out there in the open.
Jo is a content writer for 'Great Outdoors' (http://www.greatoutdoorsdirect.co.uk),
a foremost seller of the finest camping and outdoor equipment in UK. If you are planning
to go on an outdoor adventure and need a number of ladies
waterproof jackets or just looking for a superior branded tent, outdoor clothing and
footwear, and other camping equipment to buy at unbeatable costs then check out Great
Outdoors.
While many parents avoid traveling
with young children, a bit of preparation can ensure a successful family vacation. By
making a checklist of all your necessities and planning for any difficulties, you and your
family can enjoy your vacation instead of worrying about what could go wrong. Here is a
list of travel tips to help you prepare for your family vacation. By following some of
these suggestions, you and your family will always remember your family vacation for all
the right reasons.
You certainly can’t expect your children to be perfect, so set some reasonable
expectations for your family vacation. Perhaps one of the best ways to keep your children
interested throughout your family vacation is to involve them in the planning process.
Your children will be excited to have a hand in the itinerary and will learn about the
destination before you depart. Once you arrive, you can be confident that your kids
won’t complain about the chosen activities.
Regarding air travel, you might want to try securing seats in the front row of the
aircraft. The front row of seats will grant your family some extra space and privacy,
which are especially helpful if traveling with infants or toddlers. Your children should
also be able to wander with more ease at the front of the cabin, but ask the flight
attendant if you aren’t sure what is acceptable.
While non-stop flights are recommended by many for family travel, a break can sometimes
be useful. If your family is traveling to the Caribbean, an hour or two in an airport can
take some of the edge off a long day. Not only will your children be able to walk around
and stretch, you can also stock up on snacks and any items you may have forgotten.
If you are traveling with older children, you might want to consider an early morning
flight to prevent any delays. When flying with infants and younger children, many families
prefer late night flights as they correspond with the child’s natural sleep schedule.
When traveling to the Caribbean or any other international location, pack all the
medicines your children might need – both prescription and over-the-counter
varieties. As many countries have different medicines than the U.S. and packaging may be
considerably different, don’t take any chances. Check the carry-on restrictions and
pack whatever you can in your carry-on baggage. It is also a good idea to pack a change of
clothes, a blanket and a pillow for your young ones to ensure that they are comfortable on
the airplane.
One of the greatest difficulties of family travel is the transport of large items like
strollers and playpens. Before you leave for your trip, contact the concierge of your
Caribbean resort regarding the availability of cribs, strollers, car seats or anything
else your baby might need. If your hotel is unable to acquire any of these vacation
essentials, there are a few international organizations that arrange delivery of such
rental items.
Organize a selection of toys like dolls, stuffed animals and books in one of your
carry-on bags. To prevent any unnecessary embarrassment, try to avoid packing noise-making
toys or those with small parts – like model kits, building blocks or board games.
Portable DVD players and CD players can also keep your children occupied and entertained.
It is also a good idea to pack some healthy snacks for your children, as it is often
difficult to please with airline food.
Your preparation should also include planning for unforeseen events, such as someone
getting lost or sick. By planning all the small details – down to what type of trail
mix to eat on the airplane – and more serious issues affecting your itinerary before
you travel, you and your family won’t have to spend your family vacation worrying.
You will simply enjoy every minute of it.
This article was written by Justin Burch. Justin writes
select pieces about travel in the Caribbean and Mexico for the Paradise by Marriott
Picking the best travel buddy is certain to be a tough decision. There
are many different things that can be considered to create the happy,
relaxed and friendly atmosphere for the duration of a trip. Let's take a
look at a few of the important things:
Personality
A great place to start in the search for a travel buddy is to find
someone with the same or similar type of personality. Whether you are the
relaxed type or those that are constantly on the go and energetic, you will
find it benefits to travel with the like-minded companion. Also, the type of
activities in the travel plan can influence the travel buddy.
Additionally, it is important to make sure the travel itinerary is able
to complement both parties. It will certainly help if the personalities
match in this area because a happy-go-lucky person and an organization
junkie may have difficulty getting along.
Budget
Many travelers prefer to stay in a decent hotel on their travels and eat
at restaurants in the evenings, while others will have no issue with moving
from one cheap guest house to the next and eating out or even enjoying the
street food scene in certain countries. Instead of getting frustrated with a
travel buddy about the cost of travel, it will benefit to have a proper
conversation in order to come to a satisfactory agreement before getting on
the road.
Shared interests
It will certainly help to travel with a travel buddy that has shared
interests if you want to avoid long periods of awkward silence. The ability
to keep a conversation going will be very difficult if both parties have
completely different interests. For this reason, you will find it benefits
to travel with someone who shares one or more of your interests.
Practice runs
A great way to decide if a travel buddy is the right fit for a long trip
is to take a practice run. This can simply involve taking a short trip
together for the day. It can help to travel to a completely new place for
both parties and see if you can both agree on things like finding a
preferred restaurant, activities, transportation, etc. It may be necessary
to compromise at times, but the all-round experience should still be fun and
enjoyable.
Overall, it can take time to find the travel buddy that matches the
personality, so the entire process should be carefully planned to minimize
issues when traveling.
Discover more about finding the best travel buddies for your adventures.
Article Source: http://EzineArticles.com/expert/Leo_Eigenberg/1776992
You have packed your bags, books your flight and reserved a room in your
desired hotel, but you have not chosen a good airport shuttle yet. This is
an important consideration. After all, you need to find a means to get you
and your fellow travelers to the airport with all the luggage in a timely
fashion. And then you need to make arrangement to reach the desired hotel in
the destination city/country. Let's give you a few tips to make your
transfers from airports and cruise terminals as smooth as possible.
Opting for the best bus for a timely service can make a great difference
to start and end your trip. We are going to tell you the things that you
need to keep in mind to get this job done.
Consider the Reputation
In the destination city, you can choose from a variety of airport shuttle
services. However, as far as timely service is concerned, make sure you go
with responsible drivers and vans that have enough space to accommodate you,
your fellows and the luggage. So, this is the first most important factor
that you may want to keep in mind.
Just like other types of businesses or service, the reputation of the
shuttle services matters a lot. In fact, this is the best way of determining
whether the service provider is good or not.
An easy way to check the reputation of the providers is to read reviews
on the internet. Aside from this, you should check out if the provider has
the necessary licensing and credentials to provide service in your location.
Ideally, you may want to choose a shuttle service that works with
experienced chauffeurs and owns different types of vehicles. Moreover, the
provider should be insured and licensed.
Opt for the Right Size
As far as opting for the right airport bus, know that size matters a
great deal, especially if you are going to travel with a group. You can
choose from a lot of shuttle sizes. For small groups, you can pick from a
variety of sedans. On the other hand, SUV services are much better for large
groups.
Here is another situation. If you are with a small group but you need to
carry a good deal of luggage, we suggest that you hire an SUV. This is a
better choice in terms of comfort.
Choose a Punctual Service
At times, our travel plans change due to many factors, such as bad
weather and other emergencies. So, you need to make sure that the airport
bus will be there for you when you get there.
Some services can track your flight to make sure they reach the airport
in time to pick you up. This type of service can help you have the peace of
mind as you won't need to worry about this matter even if you arrive a bit
late.
The Takeaway
In short, choosing the best bus is easy if you do your homework
beforehand. So, make sure you choose a shuttle service that is experienced,
insured, licensed and reputable. This will save you a lot of headaches later
on.
For easy transfers from airport and cruise terminals in Europe, we
suggest that you hire a good airport shuttle service.
Preparing ice boxes (called Eskys in Australia, or Coolers in The USA) and their
contents is critical in retaining ice for lengthy periods. With higher ambient
temperatures during summer, correct preparation is especially important during this time.
The first thing you can do is select an ice box with thick insulated walls and lid. A
thick insulated lid is important, as a lot of heat can be absorbed into the cooler with
the sun beating down on it. Many cheaper ice boxes have lids that are air filled i.e. use
air as the insulating material. Good quality eskys in Australia will have high density ISO
POLYOL insulation in both the walls and lid.
Next, prepare the esky for your trip. Cool the interior with a little ice slurry (ice and
water). Leave the slurry in the ice box for up to six hours. This will cool down the
interior and also cool the insulating material. It is amazing how much ice a warm ice box
cooler will burn just cooling the box itself down.
Selection of the ice you will use will have the most impact on how long it will last. If
you are using party ice, choose crushed party ice for your cooler. This is made from
crushing large blocks. This type is solid throughout and well conditioned. Party ice that
is manufactured in a machine as individual cubes is not as suitable for your esky as it is
often hollow and is considered not well conditioned.
Best of all is well conditioned block ice, either purchased from a supplier, or better
still, frozen in your own freezer. Plastic bottles are great for freezing water and best
of all; you can drink the cold freshwater from the bottle after it has thawed in the ice
cooler. Remember to leave some space for the frozen water to expand in the bottle. You may
wish to top up your ice box with party ice to fill the gaps between the blocks, always
remember that the more ice the better.
When you fill ice box coolers, it is best to fill it with pre-chilled food and beverage.
You will burn a large amount of ice cooling your contents if it is not already chilled. As
a guide, it is best to use one third food and beverage to two thirds ice. This two to one
ratio will ensure that you have the right amount to keep your contents cool for many days.
Many people make the mistake of filling the esky with food and beverage, then adding a
small bag of ice with the expectation that it will last for a week. This is not going to
happen. As a guide, a good 80 litre cooler will burn 3-5 kg of party ice per day even
following the advice in this article.
If you are camping for an extended period of time and ice retention is critical, then fill
your esky with goodies and ice the day before. This will cool your contents and the box
itself. The next day, empty the ice box of ice, and refill with fresh, well conditioned
ice. You are now ready for an extended trip, and your ice will last as long as possible
There's at least one good thing about the bad economy: it's causing us to be more
creative when it comes to planning romantic evenings with our beloved. It's hard to
imagine something more romantic than an al fresco meal shared with a lover under the shade
of a tree or under a sparkling summer sky, isn't it? Here's how to do it right.
Plan ahead
To make your picnic perfect, it's essential to plan a week ahead: scout out prime
locations, get the right equipment if you don't already have it, and plan a really special
yet simple menu. If you do it in a rushed way at the last minute, it won't be nearly as
effective. Your sweetheart will really appreciate a picnic that has obviously been
lovingly planned.
Good food: the ultimate aphrodisiac
Now is not the time for store-bought fried chicken! Your meal will need to be highly
portable, yet still have a hint of sophistication. How about a simple loaf of crusty bread
from the bakery along with different kinds of cheeses and fresh fruits and vegetables?
Bring along a bottle of wine for extra romance or sparkling cider if you don't drink.
Don't forget dessert: chocolate-covered strawberries are a perennial winner. Today's fine
picnic baskets make transporting your feast easy as well as elegant: so make sure to do it
right.
Make it a surprise
Remember how much you used to love surprise parties? Well, how about making your
romantic evening a "surprise picnic?" You could pick up your sweetheart at work
and have everything all ready to go, or if it's winter time you could have an indoor
picnic all spread out on a quilt right in front of a cozy fire when your lover comes home.
You don't have to spend a lot of money to have a really romantic picnic: it just takes
a little imagination, a little advance planning, a little effort, and a whole lot of love.
Because LED flashlights offer such energy efficiency, powerful luminosity and
longevity, they're rapidly becoming the go-to light for any situation. Even if your hands
are full with your current adventure or project, there's an LED light to meet your needs.
Whether you're a camper, hunter, carpenter or angler, here are five hands-free LED light
solutions to light the way.
1. LED Zipper Pull
For hunters and anglers who are trekking through the woods or stranding thigh-deep in
water, an LED light on a zipper pull makes a useful and versatile survival tool. Clipped
to your vest or jacket zipper, this little LED flashlight stays tucked out of the way yet
is readily available whenever you need it. Some LED zipper pulls even feature a built-in
compass and thermometer for extra utility. And thanks to LED technology, these compact
lights provide a powerful beam that can last for thousands of hours.
2. LED Clip Light
A brilliant LED beam on an alligator clip offers ultimate versatility, providing a strong,
focused light wherever you need it yet leaving your hands free to work. An LED clip light
attaches easily to a tent flap, car hood or toolbox and fits into any tight space where
you need some illumination. Clip lights are nothing new, but when combined with an LED
bulb, they become more compact, powerful and long-lasting than ever.
3. LED Lantern
For shedding light on a larger area, an LED lantern is the way to go. LED lanterns burn
cool, so they're safer than propane or incandescent bulbs, which means you can hang them
or set them anywhere you need light--even inside a tent. Many are even waterproof so you
can take them out on the boat. To get extra life out of the long-lasting batteries, look
for an LED lantern with a dimmer switch.
4. LED Headlamp
An LED headlamp is the preferred hands-free light for many outdoor types. Fitting
comfortably on the forehead, an LED headlamp is lightweight, compact and sheds light
wherever you face. LED headlamps can offer either a broad flood beam or a focused spot
light, and some models even provide both.
5. LED Pocket Pliers
If you're working with tools in a tight space, a set of LED pocket pliers might be the
solution you need. LED pocket pliers combine the versatility of a multi-tool with the
luminosity of an LED light built into the handle. An LED multi-tool will typically include
a knife blade, multiple screwdrivers and scissors, all wrapped up in a compact tool that's
easy to store.
LED lights come in a vast array of shapes, sizes and styles. Any time you need powerful
lighting but don't have a free hand to hold a flashlight, one of these hands-free LED
light solutions may be just what you're looking for.
Ben Nystrom lives in Portland, Ore.
Find the most rugged long-lasting
LED flashlights, lanterns and headlamps on the Coast website for energy-efficient LED light products for the home and
outdoors.
You
would think shopping for something like folding typechairs would be simple, but it can actually be quite the challenge.
There are so many different brands, styles and features to choose from and
you can find the perfect folding outdoor chairs that are high quality and
still affordable.
Always
check out the frame of a chair before buying it. The frame should be sturdy
and solid. If you are overweight you may need a special chair that is going
to hold the weight without failing. Considering the material of the chair is
also important. You are going to be using it outside, in the elements, so it
must be waterproof and weatherproof. Gortex is a preferable material for
outdoor folding down chairs. The material is completely waterproof but also
lightweight. It will stay dry and even if it does get rained on it will dry
very quickly so you always have a dry place to sit.
You
may be interested in the chairs that have a seat on them. This way you can
take out your food and then still have a place to sit down and eat it. These
chairs have a sturdy base and fold open into a chair. Some even have a fold
out cooler underneath, so you can actually store your food and drinks right
in your chair. These are ideal for camping and other outdoor adventures
because you can carry everything in one bag and not have to worry about
toting multiple bags around everywhere.
Outdoor plastic folding chairs are the least expensive. Because they are so
cheap however, they break easily. If you travel a lot or otherwise know your
trips will be pretty rough, it would be more to your benefit to get some
heavy duty outdoor folding chairs. These will stand up to the wear and tear
you put them through and not chip or dent.
Metal
outdoor folding chairs are the most durable. Typically made of a lightweight
aluminum, these are easy to carry around and some even fold down so they fit
in the back of your backpack.
Chairs
are an essential item to pack for any camping trip. Now that you know what
to look for you can feel more comfortable out shopping for new chairs.
Eating fish full of omega-3 fats may be connected to a reduced risk of
stroke. However, new research suggests it’s not just how much fish you
consume that matters, but exactly how it’s prepared.
Dr. Fadi Nahab of Emory University led a team that studied the role of race
and geography in stroke incidence, with a particular focus on the “Stroke
Belt’’ inside southeastern United states of America, where stroke death
rates are higher than the remaining areas of the country.
For the study, more than 21,000 people answered a telephone survey about
their fish consumption. It was found that fried fish consumption was 30 %
higher inside the Stroke Belt compared to the remainder of the country.
African-Americans ate more fish each week than whites, and they were also 3
1/2 times more prone to eat at least two servings of fried fish each week
than whites.
The research reports that consuming more fried fish might have a connection
with higher incidence of stroke.
Having fried fish may decrease health benefits in 2 ways, they said. First,
lean fishes for example cod or haddock are more likely to be deep-fried than
omega-3-rich salmon, herring, or mackerel.
Second, frying fish is thought to reduce natural omega-3s and replace it
with cooking oils.
CAUTIONS: The food surveys were a snapshot, so that they didn't take into
account dietary changes with time that could be crucial in stroke risk. More
studies are required to establish whether individuals who eat fried fish are
very likely to have strokes.
So
how to cook fish? Here's my magic fish recipe: "Mediterranean
Fish Fillets"
Makes 6 servings.
Prep Time: Ten minutes
Cook Time: Twenty or so minutes
Ingredients:
1
1/2 pounds firm white fish fillets, such halibut, striped bass or orange
roughy
1
tbs extra virgin olive oil
1/2 cup finely chopped onion
1
can (14 1/2 ounces) diced tomatoes, drained
1/2 mug pitted Kalamata, green or black olives, cut in two lengthwise
2
tbsps . white wine
1
tsp . Basil Leaves
1/2 teaspoon Garlic Powder
1/4 teaspoon Thyme Leaves
Directions
1.
Preheat oven to 375°F. Coat baking dishwithout
stick cooking spray. Put fish in single layer in baking dish. Delicately
salt and pepper the fish. Bake 12 minutes. If fish is over 1-inch thick,
increase cooking to 15 minutes.
2.
Meanwhile, heat oil in medium saucepan on medium heat. Put onion; cook and
stir 5 minutes or until softened. Add tomatoes, olives, wine, basil, garlic
and thyme. Simmer, uncovered, 3 minutes.
3.
Take out fish from oven. Spoon sauce over fish. Come back to oven; bake 5
minutes longer or until fish flakes easily using a fork. Serve instantly.
Nutrition Data per serving size:
Calories: 201
Fat: 9 g
Carbs: 5 g
Cholesterol: 37 mg
Sodium: 477 mg
Fiber: 1 g
Protein: 25 g
About the Author: Pamela Teresa Robinette is
writing for the Mediterranean recipes website, her personal hobby blog devoted to tips to help
people eat healthy following the Mediterranean style diet.
There are a lot of ways to cook outdoors and grills
are just one of them. The technique of cooking over an open fire is as old
as humanity and it’s still very popular. Grilling over coals is by far, the
best way to create delicious and satisfying meals. With the many types of
camping grills available it might become hard to choose which the best one
is. Decide on what type of camping you are going to do, and this will narrow
the choices.
The outdoor person needs a grill that is easy to pack away and move from
place to place.
Camping grills come in various sizes, and even the smaller ones are
excellent for cooking on. Some camping grills come with foldable side
shelves, extendable legs, warming grates, and are light weight. Portable
Grills come in charcoal, gas and electric; these grills give you the power
to cook most anything you want. No matter the type grill you choose,
remember to always leave room to move food around, this will help reduce
flare ups.
Charcoal grills will give you great flavor and a more authentic grilling
experience. While they may be cheaper than other grills, the cost of
charcoal is higher than other fuel sources and you have to carry bags of
charcoal with you. Charcoal grills take more time to start-up and are much
harder to clean. You have to wait until the coals have cooled before cleanup
can start. Today’s charcoal grills are far more than just a pan of coals and
a cooking-grate; some are capable of smoking food as well. Remember when
lighting your charcoal have them in a pile, and spread them when they turn
white. To lower the heat from charcoals, just spread them further apart.
Gas grills are easy to light and the cleanup can be a breeze. Propane grills
are the most popular of all grills. Propane grills will accommodate a small
canister that screws onto the grill or can be connected to a larger propane
tank. Gas grills only take 5 to 10 minutes to heat up and the heat can be
adjusted with a simple turn of the knob. To increase the flavor of your
food, you can now buy different type of wood chips to give your food more of
a charcoal flavor. It’s simple; just soak the wood chips in water for about
thirty minutes before using them.
Electric grills are the easiest of all grills to use. Just plug it in and
start grilling. However, what you gain in convenience you lose in flavor and
power. A lot of high temperature grilling cannot be done with 120 volts. An
advantage for these grills, if the weather is bad you can move it indoors.
This is about the only grill safe for indoor use. Just fill the drip pan
with water and the dripping grease will not burn and create smoke. However,
when it comes to electric grills there are not a lot of them from which to
choose.
There are a lot of ways to cook outdoors and grills
are just one of them. The technique of cooking over an open fire is as old
as humanity and it’s still very popular. Grilling over coals is by far, the
best way to create delicious and satisfying meals.
One of the joys of camping is spending time in the
great outdoors. My wife and I find it very enjoyable to
cook and eat outdoors. It just seems to make the food smell and taste
better. There is nothing like getting out the
portable camping grill and filling the air with the aroma of food
cooking on a grill.
Beach_Shelters:
Different Sun Shades You Can Use At The Beach -
By: Wayne
Nusbaum
Protection from the sun is important especially when
you are planning to stay outdoors for a certain period of time. Since the
ozone layer has become a lot thinner, peoples’ skin now need all sorts of
protection from the damaging effects of the sun’s UV rays. When outside,
applying sunscreen is enough in most cases however when going to the beach,
it is important to not just take sun block lotion with you, it will also be
added protection to carry along reliable beach shelters. These shades or
protection against the sun come in a variety of types or styles.
Here are some types of shades you can choose from shopping for appropriate
beach shelters:
1. Cabanas – depending on the size, these can also be called gazebos and are
often associated with canopy and chairs in one. For varieties that come as a
complete set, it might take some time to set them up. Cabanas come in a
variety of sizes depending on the number of people that can fit under the
shade.
2. Beach umbrellas – these are the most basic types of sun shades you can
bring to the beach. Their main benefit is that they are highly portable and
can simply be propped on the ground once you’ve found a spot to settle on.
There are also umbrellas that come with a tilting mechanism and they can be
faced at any angle against the sun.
3. Tents – these are great for when you need to send a long period on the
coast or when you need to place something on the ground that needs
protection against the sun. Tents provide ground cover as well as protection
from the coastal elements which is essential if you bring kids along. Some
tents are water or shower proof depending on the material they are made of.
4. Canopy – these come in the form of tripods which are durable and very
easy to assemble. They are also very light so they are easy to transport and
they are advantageous in a way that they allow ventilation while at the same
time blocking the harsh rays of the sun.
5. Shade umbrellas – these beach shelters tend to come with lower SPF value
thus they can let in more sunlight but then they are advantageous in terms
of portability. These are preferred by people who’d still like to get some
sunlight rather than be in complete shade. These shades are convenient as
they are easily retractable however it may take them more time to assemble
to make them sturdier.
Protection from the sun is important especially when
you are planning to stay outdoors for a certain period of time. Since the
ozone layer has become a lot thinner, peoples’ skin now need all sorts of
protection from the damaging effects of the sun’s UV rays. When outside,
applying sunscreen is enough in most cases however when going to the beach,
it is important to not just take sun block lotion with you, it will also be
added protection to carry along reliable beach shelters.
Learn more about
Beach Shelters and the different things to consider when buying a sun
shades.
Going on a camping trip? Well, it is never a good
idea to do that without bringing along the right supplies and instruments
for your trip including insect repellent. And any camper will tell you that
there are a lot of stuff that you need to prepare in order to truly be ready
for anything that might happen in the wild. The usual suspects would be
tents, sleeping bags, flashlights, clothes and food. Aside from these, there
are other stuff that you can bring to help you along the way. And one of
them is the electronic insect repellent.
For those annoying insects that keep on biting you when at a camp site, you
and your mates can really benefit from an electronic insect repellent. It's
a hassle-free, cost-friendly way to repel any mosquitoes and gnats flying
around your area. This device may be electronic, but you don't really need
to plug it in. All you need are some batteries and you're all set. Some may
doubt whether a device like the electronic insect repellent is really as
effective as advertised.
The truth is that it is effective. The insect repellent releases a sort of
electromagnetic wave that repels any pest. The great thing about it is that
the waves can still pass through walls, so this can also be great when you
want to keep your children safe while they're sleeping at night. Its a
no-mess, no-trap way of eliminating any insects! And unlike other anti-pest
products in the market, this one requires less maintenance. No more dead
insect residues on the floor, and any other disgusting stuff that they might
leave behind. Truly, an electronic insect repellent is the perfect tool for
you and everybody else.
Another reason why an electronic insect repellent is much better than any
other product in the market is because you don't have to apply it on your
skin. No more sticky nights due to anti-mosquito lotions and ointments! You
just need to find a spot where your electronic insect repellent can be most
effective and that's it. No more hassles. In addition to this, electronic
insect repellents tend to be a lot cheaper in the long run. This is unlike
those other products wherein you have to buy another product each time you
finish one. And you know that can really eat up your budget. With an
electronic insect repellent, there is no need for that. You don't have to
replace the repellent itself. All you need to replace are the batteries when
the gadget isn't functioning anymore. Imagine how much money you can save
when you use an electronic insect repellent!
These days, people may remain skeptical of innovations such as the
electronic insect repellent. But in this day and age, everyone has to
believe that anything can be possible through technology. You don't have to
see it to believe it. And when you see the results, you will believe how
effective it can be. So throw away the lotions, moth balls and the mosquito
coils. Bring in the electronic insect repellent.
Going on a camping trip? Well, it is never a good
idea to do that without bringing along the right supplies and instruments
for your trip including insect repellent.
Whether you are a
casual traveler headed out on holiday, or a busy business professional who
racks up thousands of air miles each year, spending long hours on a cramped
airplane can be a miserable experience. From constantly rising fares, to
uncomfortable seats and grouchy flight attendants, many have discovered that
the friendly skies are often a real nightmare. Fortunately, there are
several different airplane pillow options available that guarantee you will
be whisked away to dream land in minutes, leaving the drama of the airplane
behind.
Perhaps one of
the most popular airplane pillows is the traditional travel pillow that
wraps around the traveler's neck. These pillows are favored by many
passengers because of their small form factor, and for the support they
provide to the head and neck. Long gone are the days where passengers were
forced to balance their heads on the side of the seat or the plane window,
only to be jostled awake whenever another passenger passed by. Instead,
these pillows make it easy to keep your head in place, making for a more
peaceful and enjoyable period of rest.
The wrap around
pillow is available in a variety of different fabrics. If your primary
concern is an airplane pillow that will take up the least amount of room
possible, you may wish to consider one of the inflatable options available
to you. There are also several pillows that are stuffed with micro-beads for
super soft cushioning.
In addition to
airplane pillows that provide head and neck support, some travelers opt for
cushions intended to provide back support during the long journey. These
pillows come in a variety of different shapes and sizes, and are intended to
alleviate back pain that many individuals suffer when remaining seated for
extended periods of time. Both inflatable and stuffed options are available.
Beyond
traditional pillows and cushions, there are several unique products that
have hit the market in recent years. For example, some travelers now fly
with an airplane pillow that rests on the seatback table, providing a space
for one to rest their head during the journey. Cushions that cover the
entire airplane seat are also becoming increasingly popular.
Regardless of
what you are looking for in an airplane pillow, there is certain to be an
option that will work well for you. Say goodbye to those miserable flights
filled with long hours of tossing and turning. Purchasing a high quality
pillow will not only make the journey more enjoyable, but also guarantee you
arrive feeling refreshed and content.
There are many
types of airplane pillows available that will help you rest while you
travel. Get an
airplane pillow and arrive at your
destination well rested.
To
better enjoy your road trip and to have enough energy once you stop for
activities or attractions bringing a good selection of snacks is essential.
You do of course have the possibility of stopping at gas stations or fast
food restaurants along the way to get the energy you need, but this is often
both expensive and unhealthy. This article will give you some ideas on road
trip snacks to bring with you to avoid those gas stations and fast food
places.
Many
of the snacks listed below requires you to bring a cooler to ensure that
they are fresh when you want to enjoy them. To keep the food cool one tip is
to freeze bottled water or juice (remove some of the water/ juice before
freezing), as this will also ensure that you always have a refreshing drink
at hand. You can also bring frozen grapes and smoothies and make your
sandwiches using bread that is frozen. In addition to the cooler and frozen
food, napkins or wipes as well as plastic knifes, forks, spoons and mugs
often come handy.
Drinks
As already mentioned bringing frozen drinks, such as bottled water or juice
is a great way of keeping the rest of your food cool while ensuring that you
always have refreshing drinks. For juices a recommendation is to bring fruit
juice boxes or mini cans.
Sodas should not be frozen, but should instead be properly chilled and
transported together with the frozen water in a cooler. Today many cars have
the possibility of cooling drinks in their cup holders, but this is usually
only suitable for shorter road trips as a single bottle or can will not get
you very long.
Healthy road trip snacks
If eating healthy during your road trip is what you are looking for there
are plenty of options. This section is divided into snacks based on nuts,
fruit, vegetables and sandwiches.
Nuts
provide you with plenty of long lasting energy, and combined with dried
fruits they make up a both healthy and tasty snack. You can make small
portion bags with home made mixes, maybe one for each of the passengers.
This makes it easy to enjoy your snack while driving without creating any
mess, but do remember that if you bring salted nuts wet wipes are very
useful. Try different combinations of almonds, walnuts, peanuts and dried
raisins, pineapples, pecans, mango, pears and apricots. Combinations of
sweet and salty usually makes a good mix.
Fresh fruit such as apples, oranges, grapes and bananas make up a great
snack, but don't forget to put them (except the bananas) in your cooler.
Also summer berries are great, try mixing blueberries, strawberries,
raspberries and blackberries. But enjoy them outside the car as berries
easily becomes a bit messy.
Baby
carrots, cherry tomatoes and sliced vegetables are snack options that
typically do not require a cooler, which makes them convenient to bring if
you either want to avoid bringing the cooler or if it is already full of
other snacks and drinks. Depending on your trip destination and route you
might be lucky enough to find roadside fruit and vegetable stands, if this
is the case you should definitely make a stop to get your snacks as fresh as
possible.
To
make healthy sandwiches try a multi grain or whole wheat bread with minimum
amounts of sugar, add low fat toppings such as turkey, chicken or light
cream cheese. You can also either add dry vegetables to your sandwiches or
combine them with a fruit salad or some yogurt.
Less
healthy road trip snacks
If you are not very fond of the above mentioned snacks, or if you want to
bring something more in addition to the above there are tons of options.
Below you can find some ideas, and in addition to these you can of course
find plenty of bars, crisps and candy at your local grocery store.
Bringing a dip such as thousand island, peanut butter, cream cheese or maybe
a home made combination of honey and cinnamon for your fruits and vegetables
will make both the kids and your self happy. Peanut butter or peanut butter
and jam sandwiches are also highly recommended.
When
picking up your bag of crisps all options are actually not as un-healthier
as you might think. Typically baked, or even popped, crisps will be
healthier than the ordinary fried ones. The same goes for cookies, if
you for instance go for one with a lot of fiber based on oatmeal or
containing nuts and dried fruit, it will not only be healthier but will also
keep you going longer than ordinary cookies. Chocolate bars are great but be
careful when eating them to avoid stains on our car seats, and don't forget
the wet wipes to ensure that you can quickly remove any stains that you do
make.
Alec
Sand is interested in everything related to road trips, where to go, when to
go, what to bring and what do to along the route. One of the more popular
pieces written by Alec Sand lately is his article on Top 5
Road Trip Games for Adults. Take a few
minutes to read it, and the long hours on the road will just fly by.
The
best way to view the world at night is with bright, clear, white light,
right? Whether maneuvering around a campground, looking for a lost pet,
lighting one's path for trick-or-treating, or for any other activity that
requires light at night, using LED flashlights with white lights seems to be
the logical lighting solution.
So why is it then
that many fishermen, hunters, and military personnel prefer NOT to use white
LED flashlights light while navigating at night? Well, in reality, that
white light isn't really helping our vision, it's destroying our natural
night vision. Understanding the mechanics and biological processes behind
human vision will help explain why the use of LED flashlights with white
light is sometimes avoided at night.
The Workings of the Human Eye
The way a human
eye works can be compared to how a camera operates. Both control the amount
of light that enters so that there is a clear exposure for the incoming
image. The camera records this image on film, but the eye has a slightly
more complex system.
Light journeys
through the cornea, pupil, the lens, and the jelly-like vitreous humor
tissue until it reaches the retina. The retina is a layer of tissue located
at the back of the eyeball and is made up of millions of light-sensitive
cells called rods and cones. Cones will pick up on color and detail mostly
in the daytime. Rods will focus on monochromatic vision in more low-light
conditions.
Upon coming in
contact with light, the rods and cones send electrical signals to the brain
via the optic nerve. Once the brain has translated these light signals, we
are able to view the world (our equivalent of the image being recorded on
film).
Rods and Your Night Vision
Night vision is
produced by chemicals in the rods called rhodopsin. Rhodopsin, a biological
pigment that is highly sensitive to light, molecules change shape when they
absorb light and this process results in the detection of light.
Ever wonder why
it takes time for your eyes to become accustomed to the dark again after
being exposed to bright light, such as from an LED flashlight? Well, this
happens because those rhodopsin molecules take time (usually around half an
hour) to retain their night vision shape after the eye is exposed to bright
light.
The light
spectrum where rods and cones are more sensitive is also another interesting
component of the inner-workings of the human eyeball. On one side, the
yellow-green section of the light spectrum, cones are more sensitive, hence
why newer crosswalk signs are a bright yellow-green color so that they can
stand out to drivers. On the other side, the blue-green section of the light
spectrum, rods are more sensitive. So, colors such as red are harder for
rods to pick up on. Hence why many outdoorsmen prefer using colored LED
flashlights instead of white in order to preserve and protect their night
vision.
Preserving Your Night Vision
Now that you have
a better idea as to what some of the inner-workings of the human eye are,
it's time to choose the best LED flashlight for your night vision needs.
Though most people choose LED flashlights that mimic daylight due to being
more comfortable in the day time (and our cones can pick up on both color
and detail), it's time to think about what flashlight is best for your night
vision.
There are LED
flashlights that can emit yellow-green, blue-green, or red light, and even a
type of LED flashlight that can contain all three of those light options,
plus white light.
It may be
difficult to choose which color spectrum to have with your LED flashlight,
so think about the usage of this flashlight.
-Red light is
great for when you want to use as little light as possible (rods cannot
detect this kind of light which makes it great for maintaining your night
vision).
-An LED
flashlight emitting yellow-green light is great for when your need to read a
color map (cones will be able to detect the colors and details more easily).
If you are concerned about protecting your night vision, cover one of your
eyes while using the yellow-green light.
-Blue-green light
is great for using as little light as possible and detail is not necessary
to see.
Now that you know
a little more about how the human eye and night vision work, perhaps you
will choose an LED flashlight that has a few more options than just white
light.
For
more information on selecting, using, and maintaining
LED flashlights or headlamps, visit the
website for Coast Products, a Northwest manufacturer and distributer of high
quality LED lights, at
www.CoastPortland.com.
By [http://ezinearticles.com/?expert=Ronnie_Price]Ronnie Price
If you are like me, you possibly have fond memories of outdoor activities,
getting together with family and friends. For me, part of the experience
includes memories of the food cooked outdoors - the aromas of cooking bacon,
and the handing out of the inevitable cooked (or burnt) sausages.
Now of course, you could take your barbeques with you and have all that fun
of getting the thing going, and the waiting - while tummies are rumbling
with hunger - for the coals to become hot enough to be able to start
cooking.
Fortunately, for quite a while now, we have had access to quite a wide range
of Portable Gas Stoves which makes the cooking experience so much quicker
and easier. There are many types of Portable Gas Stoves available from
single to multiple burners, which can run on a variety of fuels depending on
the stove.
So what are the considerations for the type of Gas Stove suitable for your
purpose? Well, if you are on a Backpacking or Cycling holiday you obviously
don't want to lug around a large multi-burner. You would need Arnold
Schwarzenegger to carry it around for you.
Conversely, if you and a group of friends are planning a trailer outing, a
single burner stove would not 'cut the mustard'
Sounds obvious I know, but I have been to a few disasters, where the poor
old Chef is stressed out, frantically trying to cook for too many people on
a small Stove.
Portable Gas Stove types
If you are backpacking or cycling, then there are a number of single burners
which are light weight, small and compact. A few fold down to quite a small
size, which is ideal for backpacks. They all use small fuel canisters which
are easy to carry around
If there's more than a few of you, you can also get a dual stove which folds
conveniently in half for storage, and still fits inside a backpack. A bit
bulkier perhaps but still fairly light.
At the other end of the scale are some excellent stoves which include a
number of features which include foldable legs, multiple burners etc, plus
many have the ability to add-on grills, griddles or ovens. These types are
excellent for cooking from the trailer or tailgate for larger numbers of
people.
When considering what type of Gas Stove you need, think about the number of
people you need to cook for, plus the type of food that you will be cooking.
Are you heating water or warming pre-cooked food on a burner? Do you need a
griddle for fish? A grill for sausages etc?.
When your 50 miles from home, it will be a bit difficult to cheat, and pop
in the kitchen to shove those chicken legs in the oven.
Fuels
A number of fuels are used for outdoor cooking stoves e.g. Kerosene,
Alcohol, White Gas, and Gasoline. By far the most popular fuels types used
are Butane and Propane. These are inexpensive and readily available fuels
which produces a high steady heat.
Safety
Considering the flammable and explosive properties of these fuels, care must
always be taken when using or storing these types of gas stoves.
Always remove the fuel or gas canister when not in use.
Never leave the fuels in the car, especially during hot weather.
Properly clean and maintain your stove, especially after periods of non use.
Do not store or use the fuel canisters near an open flame.
A note about using butane or propane stoves indoors: Some people do report
using Butane and Propane stoves these indoors - during power cuts for
example. However, it is very important when using these stoves indoors, that
the room is well ventilated.
Advantages
The use of Portable Gas Stoves for outdoor cooking have a number of
advantages.
Easy to set up and use.
No waiting time necessary before you can start cooking
Many variations available to suit any purpose - from Backpacking or Cycling,
to larger groups of people.
Fuels are cheap and available from many stores and outlets.
Stoves are reliable and will provide many years of service provided they are
well-maintained.
Conclusion
If you have an event planned, give a thought for the correct type of Stove.
This will hopefully ensure that you can enjoy a stress free cooking
experience anywhere you set up your trailer, tent, RV or caravan.
If you interested in any more information please check out http://www.portablegasstoves.net
Spending time outdoors with family and friends is a very enjoyable pastime,
and this can be enhanced by the tastes and smell of outdoor cooking.
Fortunately there are quite a number of [http://www.portablegasstoves.net/camping-gas-stoves]Camping
Gas Stoves which cater for all events, helping to make these happy times
memorable.
Backpacks come in a wide variety of colors. May you're
in the market for a new pack, perhaps as a replacement for the
tried-and-true pack you are so fond of that is well past its prime. Or maybe
the thought has come to you that a cute backpack would make a special gift
for the daughter that is the apple of your eye. No matter the reason, color
speaks! So you might as well know what the colors are saying and fold the
knowledge into your choice of a new backpack.
Red fires up the emotions, conjuring up diverse images,
all of which have one thing in common: intensity! From danger and power to
desire and love, red gets our heart beating and blood flowing. The lighter
the shade of red the more the color evokes sensations of joy, passion,
romance and love whereas the darker shades tend towards such diverse
emotions as courage, longing, malice, anger and wrath.
Yellow is the color of choice for those wanting to pour
emotional sunshine into the one you're buying the backpack for. Yellow
denotes sunshine and elicits sensations of joy, contentment and happiness.
It's a cheerful color and stimulates our mind and muscles. But be careful! A
dull yellow isn't helpful and raises the specter of sickness and decay.
Stick with the lighter shades of yellow to keep the focus on joy.
Orange is a powerful color bringing together the happy
influences of yellow with red's energy. It's an enthusiastic color full of
creativity and determination, a color young people naturally gravitate to as
it increases the supply of oxygen to the brain, stimulating mental
activity-and appetite! Orange is also a highly visible color, it stands out
and grabs our attention.
Blue is the calming color, bringing to mind the
wonderful canopy of the sky. It slows us down and sooths the mind. It is the
color of heaven and brings with it the corresponding associations of faith,
truth, loyalty and trust. Understand that it is also a masculine color and
is the color of choice in the corporate world.
Green is nature's native color, full of life and growth
and capable of the emotional suggestion of safety. The most restful of
colors to our eyes, green is a healing color full of hope. If you are into
money, go with the darker shades of green as they are favored in the
financial arena. (And with it, ambition and greed.) The olive shade of green
is traditionally associated with peace.
Abby Butler enjoys the outdoors and sharing this
passion with others through her writing. You can check out her latest
website [http://www.cute-backpacks.org/]Cute Backpacks, where she shares
reviews, tips, buying advice and comparisons for a range of cute backpacks
for kids, [http://www.cute-backpacks.org/cute_backpacks_for_girls.html]girls,
teens, students, work or play.
International
travel can be fun and exciting, but it can also leave you vulnerable to what
is commonly called traveler's diarrhea. Traveler's diarrhea is caused by
ingesting harmful bacteria from contaminated food or drink. The countries
where you are at the highest risk of being infected are the developing
countries of Latin America, Africa, the Middle East, and Asia. It can happen
to anyone, but there are ways to reduce your chance of becoming a victim of
traveler's diarrhea.
Eat safe food
Unlike what many
people believe, exotic or unusual food is not the cause of traveler's
diarrhea - so enjoy! Just keep in mind that thoroughly cooked foods are the
safest items on the menu. It is undercooked or raw foods that put you most
at risk for the disease. Avoid eating foods or drinking beverages from
street vendors. Don't think for a moment that fresh fruits and vegetables
are safe either. The bacterium that causes the disease is found in fresh
fruits and vegetables as well. Just remember that nothing should go into
your body that has not been cooked or boiled thoroughly.
Drink safe
liquids
Travelers are
always advised to rely on bottled water. In many developing countries, water
is usually the reason for traveler's diarrhea. You may be used to safe tap
water in your own country, but it could be dangerous in many places around
the world. If you cannot find bottled water, you will need to use water
purification tablets and drops, or boil the water for at least 15 minutes.
Water purification tablets are available in many drug stores and sporting
goods stores. Again, avoid buying beverages from street vendors.
Wash your hands
well
If you're not
used to washing your hands before eating at home, you need to get into the
habit overseas. Your uncovered skin is exposed to a multitude of germs. As a
result, your hands and not your food may be the source of the harmful
bacteria that caused traveler's diarrhea.
Use sterilized
utensils and cookware
The flatware,
cutlery and cookware you use could be the source of the harmful bacteria.
Make sure you have access to anti-bacteria soap, clean towels and sanitary
wipes near dining areas. Although, in the comfort of your home, you may be
able to see to it that your dishes and food containers are clean, travelers
seldom have the time for such details. If you are using your own cookware on
an extended stay, make sure the dishwasher does its job.
Brush your teeth
safely
Be sure to clean
and cover the bristles of your toothbrush between uses. After brushing you
can boil or wash your brush with anti-bacterial soap. Then cover the
bristles to ensure that harmful bacteria do not find their way into your
mouth. Also, be careful that you rinse with bottled or sanitized water.
Just a little
prevention and common sense can be the difference between a vacation to
remember and a vacation to forget.
Good Neighbor
Insurance represents 10 international health insurance companies and
provides
international health and travel insurance
for every country in the world. Other products include international
medical-evacuation-insurance, international term life insurance, and
international disability insurance and international group health insurance.
Also insurance is provided for short-term mission workers and missionary
teams. Good Neighbor Insurance can also provide health insurance options for
individuals returning to and/or residing in the USA.
Aside from the
beautiful view of the ocean and the great people watching there are many
benefits of walking on the beach.
Walking in sand
requires a greater effort than walking on a hard surface. Your muscles and
tendons will work harder as your foot moves around.
Walking at a
slower pace requires more effort than walking fast or evenjogging. Walking in sand requires 2.1 to 2.7 times more energy than
walking on hard surfaces. Jogging in sand uses1.6 times more energy than
jogging on hard surfaces.
For most of us
burning calories is one of the benefits of any exercise.
One the primary
benefits of walking on a beach is that you will use 20 to 50 percent more
calories than you would walking at the same pace on a hard surface.
For a short
stroll down the beach bare feet are fine, but if you are going to walk a
longer distance then make sure you walk in shoes. Put on your favorite
walking shoes or better yet your Teva sandals so you do not have to worry
about getting your shoes wet. Walking too far in sand in bare feet can
result in shin splints or a sore tendon in your heel.
As always, if you
are walking in the heat take the normal precautions: wear a hat, take a
bottle of water and don’t forget to put on your sun screen. Of course, if
you get too hot you can always jump in the water to cool off.
Since we all want
to protect our walking areas for future generations don’t wander into
environmentally sensitive areas such as dunes.
Of course you
gain the same benefits by walking in sand in any form. So you could trek
across a desert but given a choice most of us would choose to walk on a
beach. In fact many of us would choose to spend our time walking on beaches
even if there were no health benefits.
Don’t forget that
one of the many benefits of walking is that walking is relaxing so don’t
forget to stop and pick up a pretty shell, look for porpoises playing in the
surf, and notice the always changing colors of the water and the sky.
Going on a boat it is a very safe and relaxing way of travelling; probably
the oldest method of long distance transportation.
For sea lovers, being in a boat is more than just transportation, it is part
of a rich experience which can even extend to being a way of life. With that
said, whether you view boat travel to be simply a practicality or an
entire way of life, the central importance of safety should never be
disregarded and is especially important to know.
What is
a PFD?
PFD
stands for Personal Floatation Device, which cover life preserver,
Mae West, life vest, life saver, cork jacket, buoyancy aid, flotation suit
and of course the well-known Life Jacket. All these devices share the unique
function to aid to keep a conscious or unconscious wearer afloat.
PFDs are
classified by Type: Type I, II, III, IV or V.
Types I, II and
III are usually worn by recreational boaters (type III may also be
inflatable - automatic or manual), while Type IVs are throwable devices such
as life rings and buoyant cushions. Type Vs are for speciality use.
Choosing the
appropriate type of PFD for the situation is important. This can be
determined by assessing intended usage as well as the distance from shore.
Boating Smart Fact:
Do you think most drowning occur way out at sea? You are Wrong!... Nine
out of ten drowning occur in inland waters, most within a few feet of
safety and involving boats under 20-feet long. Most drowning victims had
a life jacket available and chose not to wear it.
Wear your life jacket!
For information on PDF products and other related visit:
www.marcom.co.tt
Also, like us in Facebook or Look for us in Youtube.
The following informational table is excerpted from boatsafe.com:
I am sure for
most of us getting a good restful sleep while away from home can be
extremely difficult. As you may have already noticed, a good night's sleep
is important and especially so when traveling, particularly for business
travelers.
There are many
factors that can affect our slumber and experts say if we try to follow the
'Six Laws of Sleep', we can improve our quality of sack time
most anywhere. Experts in this field recommend seven to eight hours of sleep
in a perfect world, but at least 30% of the general population suffers from
lack of rest to downright insomnia!
Let's have a
quick look at these proposed laws of sleep and how we can put them into use
while traveling away from home.
Law of Cycles...
Our bodies adjust
to regular sleep cycles within our biological clock. We are creatures of
habit and we are used to resting in the dark and typical the same time each
and every day. Try to keep as close to a normal bed time schedule as you
can. When shifting time zones, do all your best to adapt to that time zone
right away! Avoid naps and do your best to sleep in a quiet dark room or as
close to the environment you are used to at home.
Law of
Relaxation...
Relaxation will
definitely aid in your rest period. As well, avoid things that will prevent
you from sleep such as...
· Caffeine
· Nicotine
· Exercise close to sleep time
· Stress
Law of
Connections...
Keep your bed
away from home for just that, sleeping! Your mind and body connects your
bedroom with sleep. If this is not possible, then try to follow the steps
above and when you relaxed, comfortable and drowsy feeling, then lights out
as your body is telling you it is time to sleep.
Law of Comfort...
This certainly is
something we all would consider obvious; we need to be comfortable to doze,
so unless you cannot put yourself in a comfortable environment as possible,
your chances of getting a good night's slumber are greatly reduced. Also,
try to avoid large meals shortly before, alcohol and other fluids that may
have ingredients that could keep you awake and alert.
Law of Effects
All these things
mentioned above can add up to a lack of sleep or insomnia. It could be just
one or many that keep you awake when traveling and at home. By following a
few of these guidelines, your chances should improve greatly for a rest in a
new unfamiliar environment.
Law of Non -
Resistance
Finally, sleeping
is something we cannot control but can make the conditions right for a
better chance. The more you try to fight it, the less chance you will have
of sleeping!
Be sure to check
out more helpful tips on
Travel Health and much more so you can
enjoy Healthy Family Holidays.
Robert Tellier
Robert Tellier -
A passion for travel and with over 35 years experience in the Travel
Industry, I now enjoy sharing travel information, tips, destinations,
photos, videos and so much more, helping to make your family travel
stress-free and enjoyable. Please visit:
Gr8 Travel Tips and receive my Free Travel Tips eBook just for
dropping by!
It's
time for vacation planning and you are looking at the available hotels in
your destination area. Which one is going to be best for you? If you are
planning to visit the beach, or perhaps even another country, it pays to
spend some extra time considering all of your options. What you may find is
that some locations are simply ideal. You may fall in love with the hotel so
much so that you come back to it time and time again. If that sounds good,
but you are not sure how to find a facility like that, consider a few of the
mistakes people often make when booking them.
You
Don't Consider Location
One of
the biggest mistakes you can make when selecting hotels is simply not
looking at the location of the building. You can do this, often, by using a
map locator for the address of the facility. Where is the building exactly?
If you want a beach hotel, for example, you don't want one that's two
streets away from the sand and surf. You want one that's right there, close
to it all.
You
Think Cheaper Is Better
It is
common for people to book facilities that are less expensive, because they
want to have more money in their pocket when they are checking out the area.
While that may be the case, you could very well end up in a room without a
view, with a bed that seems as though it is made of stone, and with limited
access to any of the attractions you plan to visit. Cheaper is not always
better. In fact, it could cost you the success of your trip, especially if
you wake up each morning with a sore back.
You
Didn't Ask About the Deals
Don't
fail to look at the hotels offering packages or discount off deals. Though
you may be using one of the travel sites to track down the best offers,
don't assume they are. Rather, visit the website of the hotel. Find out what
package offers are available. Sometimes these can combine your hotel,
airline accommodations, as well as a rental care for a 30 or more percent
off discount. If you need those items anyway, why not save on them.
Not
all hotels are the same. Many offer more amenities and features than others
do. You may want to consider the way a room looks, or the amount of space
you will have. Whatever you do, don't just pick one. Take some time to
consider what the facility can offer to you. It will be worthwhile to put a
few extra minutes into this process.
Many
people travel for business reasons pretty often. When looking for hotels for
business trips, consider the hotels that have business accommodations. The
considerations vary from business services to being able to relax after a
hard day's work. This makes it a pretty easy process.
Business Services
The
first thing to consider is what kind of business services the hotel
provides. Do they have meeting rooms or places to get work done? Do they
have a business center? Think about what you are going to need. Are you
traveling for a business event, do you need a room to show presentations in?
There are many hotels out there that offer all of these services. You simply
need to know where to look and whether the services are high quality or not.
The business centers typically have a printer, a fax machine, and computers
to work on. Higher end hotels also have collation services as well as
equipment to rent. There are even locations that make it easy to rent
tablets and laptops.
Relaxation and Fun Services
People that run these places know how important it is to deflate after a
rough day of working. They offer lounges where one can go to relax and have
a few drinks in the hotel. The area may also be filled with high-end
restaurants that cater to business people. They know that it is a lot of
hard work and they know what you need. Super high-end places that offer
executive lounges have made it their life's work to build the most visually
and professionally appealing places to stay.
Making Decisions
Consider the work budget and what kind of services you and your team would
prefer to have. It is great to have all of the things you need and want in
one place. Locations that provide business services, delicious foods to eat,
and drinks to have at the end of the workday are the most appealing. Make
sure that you concentrate on the ones that have the higher ratings. Do some
research into the various options that are available. Look into their
reviews. People love to give reviews of places they have been and they list
the pros and cons of each hotel. This makes it all the more easier.
Discuss the potential locations with your team and your boss. Make sure that
everyone going on the trip has say in where they get to stay. Other business
associates can also help by giving information about hotels they have stayed
at during other business trips, which will add a positive impact to how you
all decide where to stay. Your boss in particular could most definitely
help, because they have more than likely been to all kinds of places and can
offer you some insight.
Having
planned many family trips in the past, there are a few things that I'd
recommend thinking about prior to going on a vacation. Here are five
financial aspects to look at when planning a vacation.
Activities.
Where are you going to go for vacation? What activities interest you and
your family? These activities will likely be determined by how old your
children or other guests are. My kids are big enough that we can go just
about anywhere for vacation now, but when they were younger our choices
were fairly limited. For example, if we chose to go to Disneyland (which
we did), we would have to plan for at least two days to allow for naps
for the children. This made the vacation more expensive because of
additional days for activities, food, hotel rooms, etc. You'll need to
determine the cost of tickets, entry fees, rental fees, etc. for the
activities you plan to attend. Make sure you check adult vs. children's
pricing and taxes to ensure proper allocation of your money for the
vacation. Put these funds into your spreadsheet and what they are for.
Hotel Accommodations.
My husband and I have five children, so we always must get at least two
hotel rooms. This can get pricy depending on where we choose to stay. I
tend to gravitate toward the hotels that are in the middle of the price
range. While I do love the accommodations some of the pricier hotels
offer, they just aren't necessary for my family. You'll need to decide
what type of hotel you want to stay in and what you can afford. A
determining factor may also be the distance between your hotel and the
activities you plan on attending. Keep two or three options on a
spreadsheet with pricing, distance from your activities, and
accommodations that appeal to you.
Gas / Airfare.
How are you going to get to your destination? Is your destination close
enough to drive, or will you need to drive? If you plan to fly you'll
need to check airfare pricing. You can check multiple airports. Your
flights will likely be determined by where you want to fly out of, time
when you want to fly out or arrive at your destination, and possible
accommodations / availability of what you are looking for from the
airport. If you are close enough to drive, then you'll need to look at
how many miles you'll be driving, determine time to arrive at your
destination, and determine the cost of your gas. Put these figures into
your spreadsheet as well. I always recommend rounding up a bit on gas
costs to allow for a possible detour or delay in your travel plans
Food.
Yes, it's difficult to determine how much you'll be spending on food,
but a good guestimate rounded up will give you a fairly accurate
depiction of your food costs for your vacation. You'll need to determine
what you'll be doing for breakfast, lunch, dinner, and snacks. Your
activity destination may provide food. You'll want to research what they
offer and pricing. You should check to see if your hotel offers a
continental breakfast. This will help reduce costs for you. Lunch or
dinner can be the big meal. I recommend one or the other; not both. If
you choose dinner, then lunch could be something fairly inexpensive...
maybe a local salad place. Knowing where you're going to eat for what
meal prior to leaving can help reduce anxiety. Don't forget to factor in
money for drinks and snacks for the drive or in the airport. If you are
flying, will you need a rental car, will you use a shuttle, will you
walk, or will you need to use taxi's to get around? Budgeting for your
transportation is important. Put these amounts into your spreadsheet.
Extra Funds.
Will there be other things that you'll want do while on vacation? Will
you want to go sight seeing, possibly purchase a souvenir or two, or
maybe purchase a new outfit or pair of shoes? Set aside some money for
these extra funds and put this into your spreadsheet.
Now
that you've looked at the financial aspects of your vacation, look at your
spreadsheet to determine how much you will take in cash, what your limits
will be on your credit / debit cards, etc. Financial planning prior to
taking a trip or vacation can help give you the peace of mind that you need
to actually enjoy your trip.
What
additional financial tips do you have for a trip or vacation? Please leave
me a comment and let me know.
For
more information about finances, home, and business, please visit my blog at
http://www.kristymlopez.com
All photographs (unless otherwise stated) are the property of Brian
Ramsey. None of the photographs may be reproduced without the express written
consent of Outdoor
Business Group Limited
and Brian Ramsey.