There are all sorts
of hikers, from those who love the serenity of a countryside stroll, to those who live for
the adrenaline rush of tackling the world's most thankless terrain. They all share a
common appreciation of the great outdoors. And, they all have great hiking boots.
Choosing hiking boots can be expensive and the right ones can feel
great, but are they really necessary when you're just starting out? Absolutely.
Good boots are the most important tools in your hiking tool kit. Hiking
is about walking, climbing, slipping, sliding, sloshing and, if an angry hive of bees is
involved, running. The point is, hiking gives your feet a real workout, and the more you
know about choosing hiking boots, the better protected your feet will be. Sturdy,
well-built hiking boots can protect not only your feet, but also your entire body, from
the hazards of rough terrain.
Knowing what to look for is paramount in choosing hiking boots:
Keep it Solid
The boots that you choose should have a good solid feeling on the
bottom. Which is not to say that the boots are heavy. The solid base you feel must protect
the soles of your feet from rocks and stones. Even if you can barely feel the ground
through your boots, this feeling will increase as the miles wear on, leaving you with
sore, aching feet at the end of the day. When choosing test their solidity. Press your
thumb into the bottom of the boot. If the sole has any give or feels soft, it will not
give your feet the protection you need. Twisting the soles is another way to test your
boots. If you can twist the sole, they're likely not your best choice for taking on the
trails. Remember, traversing trails is not the same as strolling the pavement around your
neighborhood. Without a solid foundation under your feet, the rocks, sticks and jagged
edges you encounter will quickly become a real pain.
Protection on All Sides
Choosing good hiking boots means looking for protection from the bottom
up, and all around. Good boots must offer protection on all sides. They are often referred
to as "heavy" hiking boots because they have extra padding to protect your feet
from protruding rocks, stones, branches and edges that can gouge into the side of your
feet. If you decide to purchase fabric boots, make sure that they have protective
"welts". These can be found about ˝ inch above the soles, providing extra
safety and ultimate comfort for your feet.
Ankle Support
If Achilles had owned a decent pair of hiking boots, his story might
have ended a little differently. When choosing hiking boots, it's important to be sure
they offer the support that your ankles need to last over long treks. Grab the top of the
boot and try to twist or bend it sideways. If the boot bends easily, it's probably not
going to provide the level of protection you'll need. The top of the boot must be stiff
enough to hold the ankle in place.
Stay Dry
Wet feet are uncomfortable, itchy and quickly develop blisters. Once the
blisters start, your feet will be out of commission for some time, so you need to make
sure you're choosing hiking boots that are waterproof, or at least have the capability to
be waterproofed. There are waterproofing solutions such as liquid silicone that can be
used on fabric boots. However, these external treatments don't usually provide the
watertight protection you'll need for all-weather use.
There is so much to know when choosing hiking boot, it's often best to
go straight to the professionals. Visit a sporting goods store or outdoor outfitters for
advice on the best boots to suit your needs. Don't scrimp on quality for the sake of a
good deal. Buy great quality boots, and your feet will thank you, every step of the way.
When you're
learning about something new, it's easy to feel overwhelmed by the sheer amount of
relevant information available. This informative article should help you focus on the
central points.
You can see that there's practical value in learning more about Hiking.
Can you think of ways to apply what's been covered so far?
It was in the 1990s when vegetarianism achieved its height of
popularity. It became the hip choice, cool, and trendy. In fact, the fad became so
widespread to the point that it became fashionable to identify oneself as
"vegetarians."
However, people seem to have a misconception of this word. Many people
have been calling themselves as such, but their definition of vegetarian included chicken
and fish.
According to the dictionary, vegetarian is defined as one who eats no
meat or fish, and, in some cases, nothing derived from an animal, like milk or eggs.
The purist form of vegetarianism is vegan. People who are vegans not
only maintain a vegan diet of no meat, no fish, and no products derived from animals
(including milk, eggs, and honey), but also completely avoid products, including clothing,
derived from animals.
For pure vegans who love to hike, their choice of hiking boots is
different than those who are not vegetarians. To ensure the utmost protection, outdoors
gear manufacturers often manufacture their boots from animal leather. Not only is leather
durable, it can also be easily waterproofed. But for vegetarian hikers, the only option is
vegetarian hiking boots.
What are Vegetarian Hiking Boots?
Vegetarian hiking boots are just your typical hiking boot, only instead
of leather, it is made of polyester or some material other than leather. People who do not
use animal products on principle find some benefits from wearing vegetarian hiking boots
as they are not made from any product derived from animals.
Where can you find Vegetarian Hiking Boots?
There are many outdoors outfitting shop that sell vegetarian hiking
boots. People who have chosen to forego meat from their diet and lead a strictly no-animal
product lifestyle would find that vegetarian hiking boots are quite easy to find.
Below are our top picks when it comes to vegetarian hiking boots for
pure vegans:
Garmont Vegan Hiker for Women
The Garmont vegetarian hiking boots are versatile - durable enough to
tackle rough terrain, yet comfortable enough to be worn casually. To give you maximum
comfort, these vegetarian hiking boots are anatomically-fitted. For protection from
moisture and the blisters they may cause, these vegetarian hiking boots are also lined
with water-resistant, quick-drying Cambrelle for all weather wear.
The Garmont vegetarian hiking boots also come with Vibram sole with pads
in its midsole for extra shock-absorption. And because not made of leather, these
vegetarian hiking boots are light enough that you won't feel like you're wearing a pair of
clunky boots.
Hurricane Ridge XCR by Montrail
Another great vegetarian hiking boots for trail runners and hikers are
the Hurricane Ridge XCR. Versatile and high-performance, these vegetarian hiking boots can
handle rugged, wet, or snowy conditions. Not only that, but it is also comfortable enough
to wear everyday, walking around in them like they're sneakers.
The Hurricane vegetarian hiking boots are waterproof, yet highly
breathable with its GORE-TEX ® SCR construction, keeping your feet dry. So if you need
the performance in rough or wet conditions, these vegetarian hiking boots can handle just
about anything.
It never hurts to be well-informed with the latest on Hiking. Compare
what you've learned here to future articles so that you can stay alert to changes in the
area of Hiking.
About the Author
www.onlinehikingtips.com - A great resource for all your hiking needs.
Another mild debate of the last few years in the
hiking/backpacking community has been that of hiking boots vs. hiking shoes.
Some don't consider this much of a debate, as many hikers & backpackers have
made the switch solely to hiking shoes, more commonly known as trail
runners. Contrary to what some believe, not everyone wears hiking shoes
while hiking. Hiking boots are still alive, and by no means are they
outdated or obsolete, as some would have you believe. This article isn't
meant to argue either point of view, just make some basic observations
between the two types of footwear.
Following are some statements made by other hikers,
backpackers or writers on the subject of hiking boots vs. hiking shoes.
These have been gleaned from the several other articles on the subject, as
well as posts on blogs & in forums.
Hiking boots are heavier than hiking shoes.
Hiking shoes, being lighter in weight, lessen the strain
on feet & legs when hiking over several miles.
Boots are constricting.
Boots normally last longer.
Boots stay wet longer than shoes.
The better ankle support which boots give is a myth.
Water enters boots more easily than shoes. Feet are
cooler in shoes.
Boots cost more than shoes.
Boots require more break-in time.
Boots are better suited for snowy conditions.
Those are just 11 quick statements I've read here & there
over the last several years. For many it seems, no matter what, shoes win
hands down. Some people hike year round in hiking shoes, that's fine. Again,
I believe this is a case of what matches up better with
the terrain you're traversing. Hiking boots are better suited, I believe,
for some conditions. Hiking shoes, I also believe, provide a great advantage
over boots in other situations. Here are some following observations from my
point of view.
Hiking boots are heavier than shoes. I
agree. Though there are varying types of materials used in hiking boots,
such as full-grain leather, split leather, nubuck & synthetic, boots are on
average heavier than hiking shoes. There are different types of boots made
for separate conditions, and this is what needs to be considered when
deciding whether or not to go with boots or shoes.
Hiking shoes, because they're lighter,
take strain off the feet, legs & back. Again, I agree. A study done many
years ago by the U.S. Army Research Institute of Environmental Medicine
revealed that 1 lb on the foot used as much energy as carrying 6 lbs in the
backpack. If this is true, then it's obvious that hiking shoes, because of
being lighter, would save wear & tear on the body.
Boots are constricting. This is
something, I believe, that's completely subject to each individual hiker. I
use lightweight hiking boots on most of my hikes. They aren't constricting
on my feet.
Boots last longer. Part of me leans
toward a yes, but reluctantly. Depending on the style boot, a pair of boots
can last longer than a pair of shoes. Heavy leather boots built for
mountaineering will outlast both lighter weight boots & shoes hands down.
This type of boot can be resoled more than once, proving that the sole will
wear out long before the boot itself will. I've seen people wear out shoes
quicker than I've worn out boots in the same amount of time. How a person
walks does much to determine the life of a boot or shoe.
Boots stay wet longer. Again, this
depends on the type of boot. Heavy leather boots will take a long time to
dry when severely wet. Lightweight boots which are made with fabric & nubuck
leather can dry in the same given time as a pair of hiking shoes. The amount
of materials in the boot or shoe & the materials themselves determine drying
time.
Boots don't give better ankle support.
Depending on the type of boot, they do in fact give better ankle support.
Higher-cut boots can aid in ankle support & give more leverage on uneven
trails or cross-country routes.
Water enters boots more easily than
shoes. This statement doesn't make sense to me. If you're wearing either
mid-cut or high-cut boots, trekking through a few inches of water, the boot
will protect your feet more than a low-cut shoe. To me, this is obvious.
Coupled with a pair of gaiters, water will have a more difficult time
entering your boot & getting your feet wet.
Feet are cooler in shoes. Another point I
agree with. Because the amount & thickness of materials used in their
construction, a hiking shoe is lighter and will be cooler to wear. If you're
hiking in an area that's extremely dry & hot, shoes may be a better choice
for you.
Boots cost more than shoes. This is
generally true. Average cost of boots is anywhere from $120-170. Shoes
average anywhere from $30-120. Yet compared with the lifespan of each type
of footwear, it's possible to spend less for a pair of boots than for 2-3
pair of shoes.
Boots take longer to break in. For heavy
leather boots, the answer is definitely yes. Yet with the lightweight hiking
boots on the market today, this characteristic is very comparable. However,
I do give the edge to shoes on this.
Boots are better suited for snowy
conditions. If there's quite a bit of accumulation, yes, boots should be
opted for in this situation. Yet I've seen & know hikers that still wear
hiking shoes with a few inches of snow on the ground. If you're just passing
through an area such as this, then it's probably not going to hinder you too
much. But for winter hiking in known snow-country, I believe it's foolish
not to wear some type of hiking boots.
What it ultimately comes down to is your personal
preference. There's really no right or wrong answer to which is better to
hike in, boots or shoes. It depends on you. No one can tell you which feels
better on your feet, which is more comfortable, or even which will last
longer. These are all subject to your hiking personality, the way you hike.
Go into your local outfitter and try on several pairs of boots & shoes, then
decide. Once you've decided, get out and put those things to work! Even if
you buy something you're not completely happy with, as long as they don't
cause you pain, just use them till it's time for a new pair.
Steve H. is a lover of nature & being involved in outdoor
activities. Whether it be hiking, biking, kayaking or some other form of
adventure seeking, he enjoys the world around him, as well as seeking ways
to help preserve the environment. He maintains the blog, http://www.crudeanalysiz.blogspot.com,
chronicling his hikes & outdoor adventures, including both gear & book
reviews.
Teenagers and kids with Type 1 diabetes can
continue to engage in activities such as camping and hiking. Some pre-planning may be
necessary, but it is easy to manage your diabetes and still attend a camp, or go on a
hiking trip. Of course, it is even easier if you go to a camp for diabetics because they
will know how to care for you in an emergency. However, you do not have to count out
church camp or a scout camp. You and your parents will need to consult with camp
counselors and other adults that will be in attendance. They will need to monitor your
progress and help you maintain proper blood sugar levels.
For children, it is recommended that they refrain from going alone to a non-diabetes
camp, if they are under the age of eight. A parent or other responsible adult can often go
along to help as a counselor, or help in the kitchen. Your child would then have you near
to care for them in case of a medical emergency. If your child or teen is going to a camp
or on hiking excursion alone, there are a few hints that will help them have a good time
and you worry less. When going to a no-diabetes camp, make sure that the camp will allow
your child call their doctor if they feel it is necessary. If the camp will not agree to
that, find a different camp. Discuss your child's condition with the camp leaders, care
providers and any medical staff before your child or teen goes to camp. Talk with them
about the need for healthy eating habits and adequate activity so insulin dosages can be
accurately prescribed.
Camping and hiking are both fun, and they are both activities in which you can take
part if you are diabetic. Always carry extra water, and purification tablets with you when
you are hiking. You are prone to getting dehydrated due to your diabetes. It is vital that
you always keep water with you. You will need to carry supplies with you so be prepared to
take care of your used supplies. Make sure to double-bag all lancets, clipped needles, and
other medical trash. While hiking, carry your diabetes supplies in the middle of your pack
and next to your back to avoid sun or heat damage. It is best to pack another set of
supplies to keep in a different place, or with someone else on the chance that you should
accidentally lose your backpack. If you utilize an insulin pump, be prepared in case of
emergency by packing extra batteries and shot supplies in case the pump should
malfunction. Keep all of your meters bound inside your sleeping bag in cold weather
because they will give inaccurate readings if they are cold. Always make sure that an
adult will check on you during the night. If you have had a day full of strenuous
activity, your insulin levels could be irregular and an adult will need to be educated
about any signs of insulin shock.
Hiking, camping, and backpacking are all wonderful outdoor activities and exercise. You
do not have to forgo them if you have diabetes. With a little more forethought and
planning, making sure people are aware of your disease, and keeping everything you need
handy, you should be able to participate as anyone else would. Take the extra precaution
of carrying extra water and healthy snacks. You will be able to enjoy your time outdoors
and you will find yourself refreshed with a positive attitude.
Gear up for an exhilarating day in
the great outdoors. Whether you're a beginner or a veteran hiker, being prepared and
following a few hiking basics can help make your adventure as safe as it is sensational.
You don't have to be a professional hiker to fully enjoy a hiking adventure. Hiking
basics begin with a good sense of the outdoors and a willingness to get connected with the
wilderness. The right equipment and supplies can help ensure a successful outdoor
adventure.
Hiking Boots
Can you safely say, "These boots are made for hiking"? If not, it's time to
go shopping. Hiking basics start from the ground up, so make sure you've got a good
foundation. There are all sorts of different styles of hiking boots to choose from. Choose
your boots and wear them for a few days before your hiking trip. If your boots are nicely
broken in, blisters and sore feet won't spoil your hike. Remember, your feet will be your
only source of transportation on the trail, so you've got to keep them comfortable.
Clothes and Accessories
There are no fashion runways in the forest, but it's still important to choose the
right clothing and accessories. You want to be comfortable, but you need protection.
Layering your clothes is always best. Start with a light shirt or tank, and then wear
flannel or fleece over top. If the hike heats up, you can tie the top shirt around your
waist; if the air gets chilly, you've got an extra layer of warmth available. Zip-off and
roll-up cargo pants are also great for offering flexibility and comfort. Remember to bring
a hat and sunglasses, just in case your hike takes you to a sunny spot.
Food and Water
It's important to keep your energy and hydration levels on track while you're on the
trail, so pack plenty of snacks and fresh water. It's great to pack light, but more
important to have enough water and food when you get hungry or need an energy boost.
Fruit, trail mix and protein bars are all easy to pack, and packed with energy. Just be
sure to take any food wrappings with you. Avoid sugary snacks and drinks that give you an
initial boost, and then cause you to crash. Sugar doesn't replenish energy, so leave it at
home. Drink lots of water along the trail to keep from being dehydrated, particularly on
hot summer hikes.
Survival Supplies
Don't underestimate nature, or overestimate your navigational skills. Accidents can
happen and you may become lost, so be prepared for anything. Pack a first aid kit for
unexpected cuts and mishaps, and bring anything you might need in the event you get stuck
or lost. Chances are, you'll never need your survival kit, but in this case, it's better
to bring what you don't need, than it is to need what you don't have.
Respect Nature
Leave nothing behind, and take only your memories. These are important hiking basics
for all adventurers. Nature is a gift that must be respected as well as enjoyed. Take a
break every now and again to appreciate your gorgeous surroundings. Bring a camera to
capture your memories. Smell the flowers and breathe in the fresh air. A few quiet moments
can create memories that last a lifetime.
A few hiking basics are all you need to hit the trail for a great day outdoors. If you
have kids that can safely hike the trails, bring them along to let them experience natural
wonders they don't get to see everyday. You'll all see the world in a whole new way.
Proper foot care is a must for
hikers and backpackers. You can be in perfect health in every other way and have a few
blisters turn a nice backpacking trip into a survival situation. Here are some suggestions
on how to avoid foot problems when hiking, and then some tips on dealing with the problems
if they do occur.
Foot Care - Preventing Problems
- Have extra clean dry socks. Wash a pair in a stream if necessary. Hang them from your
pack to dry.
- Air out your feet. Stop at least every couple hours and take off your shoes to let
your feet cool.
- Treat hot spots. Don't let hot areas on your feet develop into blisters - treat them
early.
- No hiking boots (unless you need ankle support). Running shoes are less likely to
cause blisters.
- Know your limits. Don't keep hiking once your feet are getting too sore.
- Tighten laces near your ankles when going downhill, to prevent your toes from jamming
against the front of the shoes.
Common Foot Care
Blisters should be treated as early as possible. Use moleskin (or duct tape if you have
nothing better), and cut a hole for the blister to rest in, to avoid pressure on it. If it
must be popped, do so with a sterilized needle at the base of the blister.
Black toe is a toenail that has blood trapped underneath. It happens when the nail is
continually hitting the front of your hiking boot or rubbing on the top. Try to correct
the cause (tighten laces by ankle on downhill stretches). If the nail isn't painful or
loose, you can leave it alone. Otherwise trim the nail, and wrap it with a bandage or duct
tape.
Ingrown toenails happen from a bad nail-cutting job or tight boots. The nail edge grows
into the flesh. This can be very painful. Soak the toe in salty warm water for about ten
minutes, then work the flesh back so you can cut the corner of the nail. For best results,
you can also tuck a bit of cotton or toilet paper covered in antibacterial cream under the
inflamed flesh (change daily).
Plantar fasciitis is an inflammation and stretching of the tissue that connects your
heel to your toes (the plantar fascia). You feel pain in the foot on the first steps after
resting, or in the morning. To treat this on the trail, soak your feet in a cold stream
for a while. Insoles with arch support and custom orthotics can help prevent this, if it
is a recurring problem.
Calluses are just thick and hard patches of skin. Corns are just calluses on the bony
parts of the toes. They are caused by continual friction. If they become painful, you can
use a nail file or knife to carefully file away the thickness and roughness. Try to
prevent foot injuries and problems when possible, but be prepared for them anyhow. Carry
moleskin and antibiotic cream, for example. You should also try to remember the basic foot
care for the common conditions listed above.
Taking a
hike means expecting the unexpected, so it's best to be prepared for some of the more
common things that can occur on a daylong or weeks-long trek. There are some very useful
items that you should always take with you any time you go hiking. Obviously, you want to
take a backpack. It contains everything - the things you need to survive in the
wilderness.
Most people remember to take a backpack, but it is surprising how many forget to think
about taking some kind of rain cover. You may think that you just won't go hiking if it is
raining, but you should consider the fact that, many times, a sunny day can turn rainy in
an instant. Also, going for a hike on a rainy day will get you used to hiking in the rain,
which is likely to occur when you take longer treks. Get a raincoat and include it in your
day-hiking equipment.
You may think that you'll only be gone a few hours, so why carry the weight of food,
but it is always a good idea to have some food with you on a hike. You never know when a
two-hour hike will last longer than that. You might find an interesting trail and find
yourself walking around in the woods for many hours. Ultimately, you will get hungry; so
carry some food with you when you go hiking.
Your boots are critical. When choosing hiking equipment, remember that every pound of
weight in your boots is equivalent to adding five pounds on your back. When you put too
much weight on one part of your body, another part is sure to complain. The boots you
should wear depend on the kind of trail you are hiking. Many trails can be hiked with just
a pair of sneakers on, but others can only be handled with serious and heavy hiking boots.
Make your choice appropriately.
If you plan to hike in the rain, you should get a pair of gaiters. They prevent water
from running down your legs and into your boots. If you've spent any time waterproofing
your boots just to find all your efforts have gone to waste because you didn't seal around
the space where your legs go in, you'll appreciate adding gaiters to your hiking
equipment.
You should wear two pairs of socks. Having an outer sock made of wool and an inner sock
made of polypropylene is a good combination. This method is effective in draining moisture
from your feet, and every hiker should use it.
Hiking and backpacking in the
wilderness means leaving the safety and predictability of civilization behind. That is
part of the adventure, and part of the danger. Here are six hiking and backpacking tips
you can use to make it much safer, without taking away from the adventure.
1. Carry a compass, a map, and the knowledge of how to use them. Even if you don't have
a good map. any map is better than nothing. People lost in the wilderness have often hiked
farther into it because they had no idea in which direction was the nearest road. Practice
with the compass near home, and use it before you need it, just to keep in practice.
2. Bring the necessary safety items and knowledge. On Mount Whitney I saw hikers eight
miles from the nearest road, at nightfall, with no water, facing a sub-freezing night with
short sleeves. They underestimated the time they needed for the trip. They also hadn't
prepared for the possibility of their hike taking longer than expected, or for possible
changes in the weather. Check weather reports, think of all the possibilities, and have
some preparation and planning for each before you leave.
3. Take care of your feet. Your feet might not take you back out to safety if they are
covered in blisters. Stop to air out your feet a few time daily. Condition them
beforehand. Bring a spare pair of socks to change into in case your feet get wet or too
sweaty. Cover "hot spots" on your feet with moleskin before they become
blisters. Stop to shake stones and sticks out of your shoes or hiking boots.
4. Carry matches and practice making a fire. Try making a fire and lighting it with one
match. Try it in near home when it is raining, and try it in the snow too. A fire really
can save your life. People rarely die from starvation in the wilderness, but they commonly
die from exposure. Learn how to keep yourself warm and dry when hiking and backpacking,
and always carry matches and a lighter.
5. Let people know where you are. how can anyone can come to the rescue if nobody knows
where you are? Leave an itinerary behind with someone you trust. Should you carry a cell
phone? I don't care for them myself, but they do save lives all the time. You might want
to take it and just leave the ringer off until you need it. Just be sure to charge the
battery before you go.
6. Learn a few survival skills. Basic survival skills make hiking and backpacking safer
as well as more interesting. Just remembering that sleeping under a pile of dry grass or
leaves can keep you warm could save your life someday. Knowledge of a few wild edible
plants can feed you when you lose your food, and make a trip more interesting in any case.
People new to the wilderness, but also experienced outdoorsmen have paid the ultimate
price when they forgot or refused to take a few basic precautions. It helps to read hiking
and backpacking tips like these, but apply them too.
About the Author
Steve Gillman is a long-time advocate of lightweight backpacking. His tips, photos,
gear recommendations and a free book can be found at
Most people, while hiking or walking, don't even think about the
possibility of getting lost. Unfortunately this can lead to trouble. You are usually safe
as long as you stick to established trails.
But too often, complacency can get you into trouble. You decide to take a shortcut across
the trail switchbacks. You wander just a little ways off the trail to see a bird a little
better.
All it takes is a momentary lapse of judgment and you can be lost. Don't let this happen
to you. A little preparation can avoid the problem.
The most important thing you can do to avoid getting lost is to use your head and be
aware. Take a moment before you begin and then periodically while moving. Look where you
are, where you are going and where you have come from. How does your position relate to
your surroundings? Look around for landmarks. Note the position of the sun. Which way is
north.
If you are planning to use an established trail make sure you know exactly where it will
take you and how long the trip will take. Know what turnoffs you will encounter along the
way.
As you travel the trail keep your head about you and note any side trails and turnoffs. It
is easy to get confused if you are planning to return the same way you came. Pay
attention!
The majority of trails, animal or man-made, will not take you anywhere you want to go.
They were not made for the purpose of taking you to civilization. So just following an
unknown trail hoping that it will lead you to safety can be the worst thing you can do.
During the process of getting lost there is always a point where you first hear that
little voice in your head that says, No, I can't be lost. That is the time to STOP because
you are either lost already or about to be. Immediately take stock of your situation.
Don't wait until things get worse.
Mentally trace your steps up to that point and review your path in relationship to the sun
or any distinguishing landmarks. If possible, retrace you path back to a point where you
are sure of where you are. But only if you are sure. This is not the time to be wandering
about and trying out shortcuts.
If you are not sure, you need to stay put and think. Make a mental map of your journey up
to that point. Review the distances and how long each segment took you. Try to remember
any landmarks that you can relate to a specific point or time along the way. Do this while
it is still freshest in your mind.
Then make a decision as to the best path back to a point you remember. Clearly mark your
present position with whatever you can find. Then move out, marking your path with stones
or sticks. If you don't reach a point where you are less lost, go back and try another
direction.
There are a number of things that you can bring with you that can help you not get lost
and help you get unlost.
One of the most useful things to bring is a pencil and paper. It doesn't take much to get
disorientated and our memories are unreliable. Make notes of landmarks, hills, streams,
trail forks, and the sun position. Note the time it takes to go from one point to the
next.
A compass is usually considered mandatory but you have to be careful using it. A compass
is only useful if you have a good idea where you are and which direction you need to go.
Lots of things can render the compass useless. Electrical wires, ore deposits, large metal
objects like cars or small metal objects like your belt buckle. Yes, bring a compass, but
make it a good one and learn how to use it before you get lost.
Bring a map. The most useful map is the topographical map. It will show the actual layout
of the land including heights. If you are hiking in a National Park, topographical maps
are often available for sale at the visitor center book store
A GPS is a great tool but it has its limitations. In order for it to be useful after you
get lost you need to use it before you get lost. Enter waypoints as you travel, including
your starting point. Then if you get lost you have marked an electronic trail back to your
starting point. Don't completely depend on the GPS. Batteries have been known to run down
and signals can get blocked. You still need to use your own skills in keeping up with
where you are.
The key to not getting lost is to always know where you are and where you are going. It's
not that difficult but it requires a little effort and preparation. It's worth it.
Many individuals when encouraged to go hiking express a fear of snakes and this fear
keeps them from experiencing the beauty of our natural world. The fear of snakes is an
exaggerated concern and by following some simple rules most persons will never have any
threatening experiences with snakes.
One of the key elements in avoiding threatening experiences with snakes is knowing how
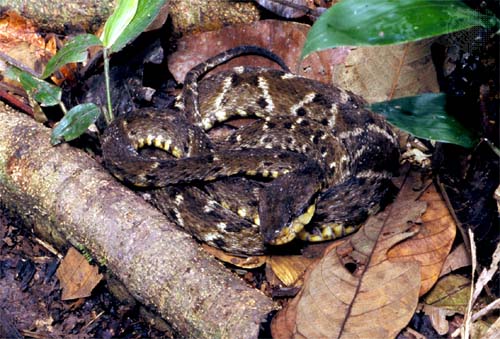
to identify them. In Trinidad, the majority of snakes are harmless
to humans; in fact there are only four species of poisonous snakes. The four types of
poisonous snakes are:
Fer-de-lance called the mapepire balsain
Bushmaster called the mapepire zannana
Two species of coral snake
Below are brief descriptions of the poisonous snakes found in Trinidad.
Mapepire Balsain
The scientific name for the mapepire balsain is Bothrops atrox. It
is also called the common lancehead, fer-de-lance and barba amarilla. The mapepire balsain
comes in a variety of colours ranging from gray, brown, olive and green. It has large dark
triangular shapes oulined in pale colours on its back, with the points of the triangles on
the spine or dorsal line. The head is triangular and pointed with a pale yellow underside.
This snake can grow to up to 6.5 feet in length.
The mapepire balsain is generally found in wet lowland forested areas in Trinidad. As a
result it is common in areas near to rivers. It is a nocturnal species but will move
around in the day in search of prey. It tends to lie in wait for prey, hidden among the
leaf litter on the forest floor or underneath fallen logs or in rock crevices. They will
also be found among banana plantations as these usually attract rodents which are their
favorite prey.
The mapepire balsain is easily agitated and becomes aggressive and will strike often in
its aggression.
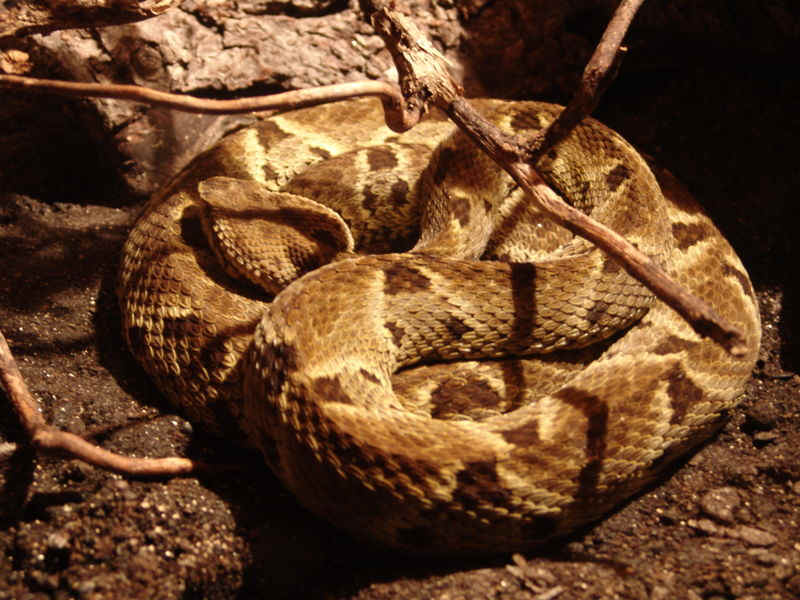
Mapepire Zannana
The scientific name for the mapepire zannana is lachesis muta muta. It is also called the bushmaster. This snake is
thick-bodied with a triangularly shaped head and upturned snout. It has well defined rough
scales along the entire length of its body and a prominent dorsal ridge. The body colour
ranges from light brown to light pink with a series of dark brown or black blotches
markings running the entire length of the body including the tail. This snake will grow to
approximately 6 feet (2 metres) and 7.5 feet (2.5 meters)
The Bushmaster is a nocturnal species but will move around during the daytime.
It is an aggressive snake particularly when agitated or startled.
Coral Snakes
Coral snakes are small thin snakes of about 60 to 100 centimeters with small heads that
are the same size as their body and small round eyes. Their round eyes are one of the
features that make them different from most poisonous snakes. Venomous snakes have
vertical slits for pupils while non-venomous snakes have round pupils. Coral snakes are
however the exception to the rule in that they have round eyes. Coral Snakes are very
beautiful with their body being marked with bands of red, black and yellow. There are
several other snake species that also have red, black and yellow bands but these species
are not venomous (poisonous). In order to distinguish the venomous species of coral snake
a small rhyme has arisen, which states "Red and yellow, kill a fellow, red and black,
venom lack". The meaning of this rhyme being that where a snake has red bands
immediately followed by yellow bands then it is a venomous coral snake. It should be noted
however that this rhyme only applies to coral snakes found in the southern and eastern
United States and the Caribbean. In other parts of the world there are coral snakes that
are venomous with other banding patterns and even banding of red immediately followed by
black. It should also be noted that in some coral snakes the yellow band is very faint and
can appear to be white.
Coral Snakes spend most of their time hidden among the leaf litter on the forest floor
or hidden under rotting wood. They are not an aggressive species.
Simple Rules
In addition to being able to identify poisonous snakes there are several other simple
measures that if followed will ensure that you do not have any dangerous encounters with
poisonous snakes. When hiking, you should not go barefooted or in sandals but wear hiking
boots or heavy walking shoes, along with long pants. The pants should be of a heavy
material such as denim, but should allow flexibility of movement e.g. cargo style pants.
These provide foot protection against bites from snakes and also protect against insect
bites, scorpion stings and cuts from sharp stones. Coral snakes for example have small
fangs that are usually unable to penetrate the fabric of a boot.
When walking through heavy brush or tall grass look down, look where you are walking.
Very often poisonous snakes are lying on the forest floor among the leaf litter and so by
looking down you will be able to see them and avoid accidentally stepping on or next to
them. The beauty of our natural world often captivates us and so there is a tendency to
look at the scenery as we walk. When hiking it is better to stop and look around to admire
the beauty of nature, rather than walk and gaze around. One should always look at the
trail while walking.
Fallen trees or logs across the trail are a common occurrence when hiking in the
forest. Most persons simply step across the fallen tree, however depending upon the size
of the log it may not be possible to immediately see on the other side of the log when you
are approaching the log. It should be remembered that snakes often lie below fallen logs.
The more appropriate method is to step on the log, look to see if there is a snake lying
on the other side and then step down.
Depending upon how strenuous the hike is, there will be intervals when you stop to
rest. The natural inclination for most persons on a rest break is to sit and fallen trees
are an inviting location for resting weary bodies. Do not sit down without first checking
the area and especially do not lean on fallen trees or rocks without first checking them
well.
Snakes and scorpions often lie in hollow logs or in rock crevices therefore you should
avoid thrusting your hands into dark places such as hollow logs, under logs or rock
crevices without first thoroughly investigating the place. Similarly before you place your
hand to pick up an object from a place that may be a resting place for a snake, such as
under bushes, among leaves, rocks or logs, you should check the area first. It is a good
idea to hike with a long stick that can be used to probe among rocks and under logs.
If your hiking trip involves overnight camping you should not leave your boots outside
of your tent at night because snakes may crawl into them to escape from the cold.
Alternatively you can place two poles in the ground and then hang your boots upside down
on the poles. Before putting on your boots you should turn the boots upside down and shake
them to ensure that no snakes or scorpions have crawled into the boots.
Never attempt to pick up a snake unless you are an expert. Even a freshly killed snake
should not be picked up as they may be able to do a reflex bite because their nervous
sytem might still be active.
If in the unfortunate circumstance an individual is bitten by a snake you should
always treat the situation as if the bite is from a poisonous snake because the individual
who was bitten may not have seen the snake or be able to identify the type of snake.
Usually with bites from a viper there is pain and swelling around the area of the bite,
however in the case of the coral snake often there is very little reaction around the bite
area and symptoms may not appear for 8 to 24 hours.
The individual who was bitten should be made to lie down and kept still. The objective
is to lower the pulse rate and so slow the spread of the venom. Ice should be placed on
the bitten area if possible. The individual should then be transported to the nearest
source of medical attention. You should never attempt to suck the poison out of the area
as you may poison yourself.
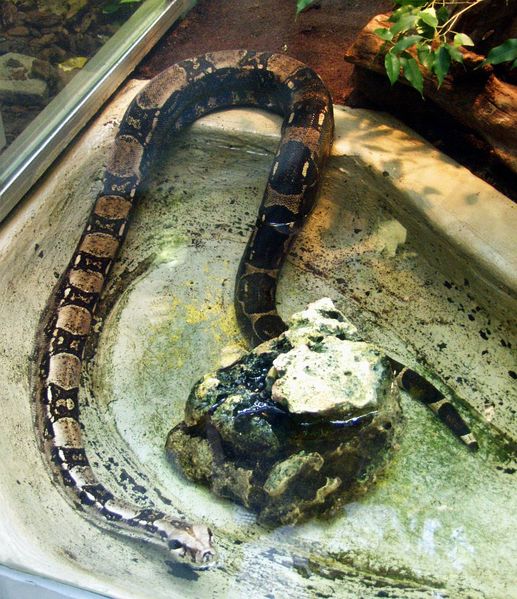
Another group of feared snakes in Trinidad is the constrictors. This fear is driven by
the images on television of snakes wrapping around an individual and squeezing that
individual to death. The majority of constrictors are of the boa family. In Trinidad, the
boa family includes Rainbow boa, Cook’s Tree boa (also known as the Cascabel), Boa
Constrictor and the Green Anaconda. The particular species that popular mythology has
created the fear factor around is the boa constrictor. Though all boa species are
constrictors, in that they kill their prey by constriction, wrapping their body around
their prey and killing the prey through suffocation, only one species is properly called a
"boa constrictor" and in Trinidad, this is known as the Macajuel (pronounced as
mah-cah-well).
The Macajuel is a heavy-bodied snake that can grow up to 14 feet with an average length
of 6 to 9 feet (2 to 3 meters). The skin colour is yellowish or grayish with a pattern of
brown, reddish-brown or black dorsal saddles surrounding lighter spots. On the face there
is a fine striping that runs through the eyes. There are dark red or reddish brown
markings on the tail. These colour patterns help the boa constrictor to conceal itself
among the leaf litter, as it is a hunter that waits for prey to come close. The boa
constrictor appears to adapt well to a variety of habitats and so is found in tropical
rainforest, grasslands, marshes and coastal areas. It is also believed that the boa
constrictor can swim or at least float with its head above water and allow the current to
carry it.
Although it is largely terrestrial, the boa constrictor will also climb trees in search
of prey and is reputed to hang from tree branches waiting for bats to fly close by, then
launch and grab the bat with its teeth. The Macajuel is a non-venomous (non-poisonous)
snake, as such the fear of being bitten is exaggerated. In some South American countries
the boa constrictor is tolerated around homes and may even be brought close to homes
because rates are a favorite prey item, thus it helps control the rodent population. This
is not to make light of the damage that a bite can do to human flesh. The boa constrictor
has sharp inward facing teeth so that when it grabs prey the act of pulling back by the
prey actually buries the teeth further into the flesh. A Macajuel bite therefore will be
painful and if untreated carries the risk of infection. The huge fear however that attends
the very mention of the name Macajuel is unwarranted and our article Dealing with Snakes when Hiking provides
advice on how to avoid unpleasant snake experiences.
Another member of the boa family that exists in Trinidad is the Green Anaconda. Known
locally as the Huille (pronounced wheel), this is another snake that generates fear and
that fear has been heightened by the movies. There are two species of anacondas, the Green
and the Yellow, with the Green being found in Trinidad.
The Green Anaconda, Eunectes murinus, is the largest snake in the world reaching
a length of up to 37 feet (111 metres) with a girth of three feet and a weight of up to
550 pounds. The average size however is more in the region of 9 to 15 feet. The Green
Anaconda has an olive to dark green colour with oval shaped black spots along the top of
its body. The sides have black spots with yellow centers. The Yellow Anaconda is mostly
yellow with similar black spots. The Green Anaconda has a large narrow head with its eyes
and nostrils set on the top of its head.
The colour pattern helps this snake to blend in well with the wet, dense vegetation of
its habitat. Anacondas are primarily aquatic, preferring sluggish or still water with
vegetation such as water hyacinths rather than swift flowing streams. As a result of this
preference for aquatic habitat it is sometimes called the ‘water boa". They will
often lie with most of their body submerged and only their head above the water. Having
eyes and nostrils set high on their head enables them to see and breathe easily with just
the top of their head above water. They can move almost silently through the water and
with almost amazing bursts of speed. In the same manner as other constrictors they grasp
their prey with their powerful jaws and inward curved teeth and then wrap their bodies
around the prey and squeeze to suffocate. An additional technique is to pull the prey
under water and drown it.
While the Anaconda prefers to be in the water, it also enjoys spending time on land and
may be found in shallow caves at the water's edge, or in riverbank trees basking in the
sun. In Trinidad, they are mostly found in the Nariva Swamp but also found in other
coastal swamp and marsh areas such as Aripero Swamp, Oropouche Lagoon and Cedros swamps.
In talking with local hunters I have been told that it is also found in inland water areas
such as around Navet Dam.
The concern for most individuals is the
possibility of an attack and while there are confirmed attacks on humans, these attacks
are rare and human deaths are rarer. In most instances anacondas will retreat will they
sense a human presence. In addition, given that most people do not walk in the water for
extended periods when in swamp or marsh areas, most persons will not be in the immediate
vicinity of areas where annacondas like to strike. If one must walk through sluggish water
in marsh areas it is a good practice to carry a long sturdy stick or pole and use it to
probe in front of you as you walk. It should also be remembered that anacondas inhabit
caves at the edge of the water and so one should always illuminate the cave and check
before entering.
Are your hiking boots delivering blisters and sore
ankles instead of providing comfort and support? Choosing women's hiking boots that will
not leave you aching can be achieved in 5 easy steps.
1. Choose A Weight
Women's hiking boots come in heavy weight, medium weight, or light weight. Heavy weight
boots are aptly named, since they tend to be heavy and rigid. Because they are rigid they
offer more support, but this can also mean more blisters. Women's hiking boots that are
classified as heavy are often chosen for going off-trail or taking longer trips.
The next class of boots are considered medium weight, and provide less support than the
heavy weight, but offer more flexibility. These are often chosen when taking short hikes
with a heavy pack or longer hikes with a lighter pack.
The last classification in women's hiking boots is light weight. When going on a short
hike with a light pack, this may be the best option. Although the above guidelines are
often accurate, some people like to use heavy weight boots for short trips, while others
prefer light weight boots even on longer trips or with heavy packs. In the end you need to
make a personal choice based on how much ankle support you need combined with the level of
comfort.
2. Make A Choice: Leather or Man-Made?
Women's hiking boots are constructed in two main ways, with some being made from
leather, while others are made from man-made material. When considering which material to
choose, keep in mind that man-made ones offer a great variance of breathability and water
resistance, while leather can stretch and support well. Depending on personal preference,
either choice can be a good one.
3. Go In The Afternoon To Test Them Out
Shopping for women's hiking boots is best done in the afternoon when your feet swell
the most. This mimics trail conditions since feet swell on a trail due to different
terrain and load levels. In addition to going in the afternoon, bring along the socks that
you will be wearing while hiking. This will ensure that you do not buy a pair of boots
that are too tight.
4. Try On Several Pairs
Since each company and different style fit differently, it is important to test out
many without settling for the first ones you try on. Trying out many styles and brands,
and going up or down sizes, can be valuable in finding a comfortable pair. If any of the
boots do not feel right for any reason at all, go with your instincts and do not purchase
them. You can afford to be picky, with all of the options available.
5. Wear Them For Awhile Before Hitting The Trail
Wear the boots for a day or two during your normal daily routines This prevents being
stuck wearing them on a hike if they are not broken in, or if they cause problems. If you
wear them beforehand you can return or exchange them for another pair that is a better
fit.
Women's hiking boots can be comfortable and offer good support for hiking. Following
the above steps will help you to find the perfect pair for your feet, and will make hiking
more rewarding and enjoyable.
River crossings can
be deceptively hazardous. Even a very shallow swiftly flowing body of water can pack
enough force to 'skittle' the unwary. If a river is in flood, then wait for it to subside.
If you cannot walk at the speed of a stick thrown into the river, or if the river is swift
and above knee height, then it could be hazardous to cross. Generally, in areas of snow
try to cross early in the morning before snow melt has added to the flow of a river. If in
doubt as to whether a river is safe to cross, then find an alternative route. However, if
that is not possible, then here are a few tips for water crossings...
Crossing Alone
1. If possible, view the river from above to identify the shallowest
point and smoothest area of river bed possible, avoiding submerged snags, boulders etc. Do
not attempt a crossing if large pieces of debris (logs, branches, etc.) are being carried
downstream.
2. Keep your boots on. Wet boots are preferable to damaged ankles or
feet.
Do not cross wearing long pants, these will increase resistance to the
current.
Release the waist and chest strap on your pack before crossing. This way
you will be able to free yourself quickly if you find yourself in a position where your
pack is snagged and holding you down.
It's also well to remember that your pack has a certain amount of
buoyancy and can serve as a flotation device if necessary.
3. Generally, the safest area to cross will be a straight section
between bends in a river. If you imagine the river in the shape of the letter 'S' then the
safest area to cross will be the middle of the 'S' between the bends. That way, if you
should lose your footing, hopefully the current will carry you into the bank on one of the
bends. Realize though, that water can be deeper and swifter at bends, so always look for
the best 'run off' section of a river that will carry you to a safe point and not into
danger if you lose your footing.
4. Use a strong pole or stick about five or six feet in length as
support, placing it on your upstream side so that the current forces it into the bottom. Always
keep two points of contact on the river bed at all times and cross diagonally downstream,
resisting the current much like you would a strong wind. Take shuffling footsteps, feeling
for the bottom. Try not to look down at the flowing water as this may upset your
equilibrium, look ahead for the best possible route. Resist the temptation to grab at
submerged or semi submerged rocks as this may upset your balance.
Crossing in a party
1. Members of the party stand in line abreast, each placing their hands
behind the back of the person on either side of them and grasping the lower part of that
persons pack shoulder strap. (or clothing if no pack is worn) This will 'interlock' the
party. If a pack does not have a quick release buckle on the hip belt, then the hip belt
should be left undone and clothing grasped instead.
2. Enter the water parallel to the current, with the strongest member of
the party in the upstream position, this will break the flow for the others. Move with the
upstream person just slightly ahead of the next person downstream and so on down the line.
If a member of the party should break away during the crossing, the
remaining members should maintain formation and either back out, or complete the crossing
before attempting a rescue if necessary.
Ensure that important items are stowed in waterproof areas of your pack.
(Plastic rubbish bags make good pack liners) If you lose your footing and are carried
away, release your pack but hold onto it. Float with your head upstream, this will allow
you to fend off from any obstacles with your feet.
Crossing in groups of three
Another crossing method is the 'Triangle' crossing.
1. Three members enter the water in the shape of a triangle with each
member facing inwards, arms linked and each grasping the person to either side of them.
The heaviest person should be at the point of the triangle that directly faces the water
flow and is on the downstream side of the triangle.
2. In turn, each member then moves one step at a time, supported by the
other two.
With any crossing, ensure that important items are stowed in waterproof
areas of your pack. (Plastic rubbish bags make good pack liners) If you lose your footing
and are carried away, release your pack but hold onto it. Float with your head upstream,
this will allow you to fend off from any obstacles with your feet. Using a rope to assist
in crossing is not generally a good idea and could be hazardous unless it is anchored
correctly and a proper technique used. Ropes can hold people under the water, entangling
the person crossing and preventing their ability to swim. They can also become snagged on
the river bed or to a rock, pinning the person in the river. A rope may also end up
pulling someone from the bank into the river. Remember, flowing water is deceptively
strong. Do not view river crossings lightly.
Method for gauging the width of a river (or gorge)
1. Sight a point 'A' on the opposite bank.
2. Place a marker 'B' into the bank directly opposite 'A'.
3. Walk at right angles for a known number of paces and then place
another marker 'C'
4. Continue for another equal number of paces and then place another
marker 'D'
5. Turn at right angles away from the river and marker 'D' and keep
moving back until your second marker 'C' and the point 'A' on the other side of the river
are in line. The distance from here back to 'D' will give a good approximation of the
width of the river/gorge.
George Spearing is the author of "Dances With Marmots
- A Pacific Crest Trail Adventure" ISBN:1411656180
Outdoor experience includes through hikes of the PCT, (Mexico to Canada) the United
Kingdom and the North Island of New Zealand.
Author's Website: http://www.danceswithmarmots.com
For anyone who spends time hiking, staying hydrated is a problem that must be dealt
with. If you cover a lot of ground while hiking, carrying water with you can be a pain in
the butt. You can only carry so many bottles of water effectively before they really get
in the way. The big thing that you want to avoid is becoming dehydrated.
Dehydration is probably one of the most common, and least appreciated, health problems
if you're hiking. Why? Because every time you're active, your body releases excess heat
through sweating. Sweating is useful; in a dry climate, the sweat evaporates and helps
cool you down even more. Staying hydrated will help your endurance, help prevent heat
problems, assist your body in working efficiently, and help prevent injuries (you're more
prone to injury and heat stress when you're dehydrated). So obviously dehydration is
something that we all want to avoid.
The best way to prevent dehydration is to drink lots of water and the best way to carry
lots of water is a hydration pack. If you've never heard of a hydration pack, it's like a
small backpack that holds water. Actually hydration packs come is different sizes, so the
size of the pack itself varies depending on how much water you want to carry. The bottom
line is that once you try a hydration pack, you'll always be hydrated while hiking. The
days of trying to carry a bunch of water bottles will be over.
Hydration packs are incredibly durable as well as convenient. They are made of very
tough plastic that will not leak or puncture, but can also be frozen. That is one of the
nice things about them. You freeze your hydrations pack, then it melts while out on the
trail, and you are guaranteed nice, cold water while hiking. Water bottles, by contrast,
don't react well at all to being frozen, and will generally crack if frozen, especially if
the bottle is full.
The bottom line is that to stay hydrated while hiking and prevent any form of
dehydration, hydration pack is the answer. Cyclists and bikers have been using hydration
packs for years, and in my opinion, hikers should jump on the bandwagon. There is no
better way to stay hydrated on the trail. Gone are the days of trying to carry enough
water bottles with you for a nice long hike.
Trevor Kugler is co-founder of JRWfishing.com. He has more than 15 years of business
experience and 25 years of fishing experience. He currently raises his 3 year old daughter
in the heart of trout fishing country.....Montana.
http://www.jrwfishing.com/camelbaks.html - This Is How To Carry Water!
One of the best parts of hiking is finding a nice spot to
rest and power up with a healthy snack while taking in the beautiful view.
While it's tempting to enjoy your favorite chips and some soda on the trail,
it's not recommended - experts strongly advise that you only bring snacks
that will do your body good. You need to keep your energy up throughout,
even if it's just a short hike. So what are the best types of food to bring
when you're hiking?
Try to take these 5 best healthy snacks on a day hike!
Trail Mix
This classic, healthy snack isn't called trail mix for
nothing! It's the perfect food while on the trail because it's protein
packed and is an excellent energy-booster. The mixture of dried fruit, nuts
and chocolate is the perfect balance between salty and sweet. The best part
is, you can customize your trail mix the way you like it - add your favorite
nuts and seeds or your preferred dried fruit. Be sure not to pick out just
the chocolate!
Granola
Just like trail mix, granola is a great mix of
energy-boosters. An easy, healthy snack to take on the trail. Experts
recommend that you go for homemade granola instead of the store-bought
variety to avoid extra sugar and other ingredients you don't need.
All you have to do is toast some rolled oats then add your
choice of nuts, seeds, fruits and any other ingredients you like! You can
add honey, agave syrup, maple syrup or a little bit of brown sugar if you
prefer your granola sweet.
Beef Jerky
Another classic hiking snack is beef jerky. Hikers and
backpackers love it because not only is it tasty, but it's easy and
lightweight to pack, too. Jerky is an excellent source of protein which
helps keep your blood sugar levels in check and refuels your muscles while
you're on the move.
Bananas and Peanut Butter
Bananas are rich in potassium, which helps avoid muscle
cramps on a day of hiking. Pair it with everyone's favorite, peanut butter!
Peanut butter is rich in healthy fats, calories and proteins. All of these
keep you feeling full and gives you the natural fuel you need!
Cheese and Tomato Sandwich
If you like your snack a little heavier, go for a cheese and
tomato sandwich - you'll feel full, but not too full to continue with the
hike. It's easy to pack and prepare and if you want it fresh, assemble your
sandwich right before you eat it!
Bring along these 5 healthy snacks on your next day hike and
you'll feel more energized than ever!
Daniel J. Smith is a survival expert. Having lived the
outdoor life since he was very young, he loves sharing his expertise
about camping, hiking, traveling, RV living and many more. He has also
started his own company called OutBright, which will soon be selling
products that cater to campers, hikers, travellers and all outdoor-loving
adventurers.
So you heard of trekking and want to give it a try. First let's see what is trekking,
shall we. Trekking is traveling slow and laboriously, usually on foot and on rough
terrain. As such you will need to be able to meet the challenges you will encounter on
your trip. You will need your body to perform under harsh condition. So let's get ready.
Foremost you need to be in the appropriate physical condition. If you've been spending
your free time watching television, doing crosswords puzzle or snowboarding online; now is
time to take up walking. Start with short distances and gradually increase it. Use a good
stride and a steady pace. In the beginning, your goal is to be able to walk at least a
mile at that pace without stopping. This will condition your legs and cardio vascular
muscles.
Since you will be walking on rough uneven terrain, you will need to toughen your feet a
little. A good practice will be to walk bare feet around the house, especially on had
floor and outside as much as possible. If you are blessed to have a beach nearby, do some
beach walk as much as possible and bare feet of course. Switching to the beach will have
some advantages, it will toughen your soles, remove dead skin and soften calluses if the
last part of your walk is done in the wet sand. It will also loosen up the muscles and
ligaments of the feet. Beach walking will also increase you balance and strengthen you
legs, thighs and gluts. Don't be surprise if you start getting tired sooner and have some
sore muscle that you did not even thought you had.
For an enjoyable trek, foot care is very important. Get into the habit of moisturizing
you feet and ensure that they are dry, especially between the toes before you put on your
shoes. If you have sweaty feet, foot powder and socks that will wick moisture away would
be a must. You want to safeguard yourself against excessive moisture that may lead to dry,
chafed soles and fungal infections. Have your toenails short but not too short. If you
already have fugal problem on the skin and under the toenail, they should be addressed
before the trip. A visit to your podiatrist may be a good idea. He will also be able to
take care of calluses and corns that you may also have. While you are there ask for
preventive measure to avoid blisters and ask for the best way to treat them. Hiking with
blistered feet can be very uncomfortable experience.
Once your feet are ready, you need to build up your endurance and strength. Start with
small hike in your area; pick small well mark trail, hill or hilly road. Stay with a
couple of hours at the beginning and build up. Once you feel that you are ready for the
long one, start trekking with a full back pack. You might see yourself a as beginner
again. At this time take your map and compass with you, even on well mark trial that will
horn your navigation skill. Also bring a little note pad which you will use to record the
weather condition and you water consumption. This exercise will help you figure out how
much water you need.
As with any venture preparation is the key. Once you follow those simple tips you will
be physically and mentally prepared for the long and exhaustive days you've been waiting
for. Do not get discourage take small steps and with enough planning you will have the
adventure of your lifetime.
Good trekking! Don't forget you camera and bring back those memorable pictures that
will make all your friends green with envy.
As a teenager and into your twenties, you loved backpacking. You would run off on
weekend trips at the drop of a hat, and never worried about what the weather would bring.
Each trip brought a new adventure, a chance to explore with friends or alone, to go
somewhere new or reacquaint yourself with a familiar spot.
But today you have a family and responsibility. You can't just pick up and go
like you used to, right? Well, even though you may not be able to run off for a
weekend hike on a whim, with a little bit of planning and preparation you can be off in
the woods having new adventures with the kids.
The most important thing to remember when you are heading out into the woods with
children is to be flexible. Pushing kids too hard or not letting them enjoy it there
way can be a recipe for disaster, and can lead to both you and them not wanting to go back
out there again.
Part of being flexible is going to be stopping more frequently than you would with all
adults. Kids do not generally have the same endurance as a fit adult, and they are
also less inclined to tolerate being uncomfortable, so be sure you plan a route that gives
ample opportunity to stop for a rest.
And speaking of discomfort, don't forget to add child sized items to your standard
first aid kit. Some ibuprofen or other pain reliever in a child size dose is a must.
You may also need to bring a kid's sunscreen and other things that come in
different sizes or doses for children. It could also help to bring along their
favorite character band-aid to give them a smile when they scrape a knee.
To keep the kids from getting bored while walking, you might want to make a game of the
hike. Getting kids to look for a certain color of flower, or try to spot birds or
other animals can give them something to occupy their minds so they don't get bored.
This is the same idea as getting them to count out-of-state registrations on a long
car ride.
Besides the time walking, kids can easily get bored while sitting in camp, so this is
another time you will want to plan activities for. Bringing a deck of cards can
help, and of course typical campsite activities like roasting marshmallows can keep them
going for hours.
Another important tip, to help keep you sane and keep you from breaking your back
carrying all the extra stuff, is to be sure to bring some help. Your spouse,
previous hiking partners, or other friends can all make the work a bit easier and help you
keep an eye on everyone to make sure you all get back in one piece.
Before you go through your hiking
equipment to ensure everyone has what they need for the trail, make a stop over at http://www.hikingbackpacktrail.com/ to
find articles and advice on equipment, food and everything else for the adventurer.
If you an avid
hiker and love to spend lots of time outdoors surrounded by the beauty of
nature, why not get your kids involved as well? Going on hiking trips with
your kids has lots of benefits. You wouldn't feel lonely during the hike and
you get to spend quality time together as a family doing something fun. It
is also very affordable and you can get your kids to do something healthy
outdoors instead of being glued to their computers or television the whole
day. Here are some necessary steps and precautions that you need to take if
you are planning to bring your kids along for hiking trips.
If this is the
first time you are bringing your kids for a hiking trip, pick a shorter and
easier trail that you are familiar with. Make sure that your kids are strong
and fit enough to last the trip. You can start preparing them for the trip
weeks ahead by taking them for jogs and playing outdoor sports to build up
their stamina and fitness level.
Consider engaging
the service of a guide if you are not a very experienced hiker. Hiking with
kids is very different from hiking alone or with hiking buddies. You have to
keep an eye over them throughout the entire journey. As such, you may want
to have another adult to be leading the way and ensuring that all of you are
on the right path.
Ensure that you
bring more than enough food and drinks to last the entire journey. Kids get
hungry easily and they get tired fast when they are hungry. Bring food that
provides lot of carbohydrates and calories such as energy bars and energy
drinks. Although you don't want to burden your kids with too much load, each
kid should have sufficient food and drink in their individual backpacks.
Before going on
the hiking trip, take the time to explain to your kids on the basics of
hiking. Teach them how to use read maps and use the compass. Each kid should
have a set in their own backpacks. Give them either a walkie-talkie or
mobile phone each so that you can still communicate with them if they get
separated from you. Lastly, don't forget to put first aid kits in everyone's
backpack.
By being well
prepared, you can look forward to an enjoyable hiking trip with your kids
without worries.
Do you like
backpacking, trekking, hiking, skiing and camping? There is nothing like the
freedom and beauty that the outdoors offers. You may only be able to get
away for an hour here and there, or you may be able to go for an entire
weekend. Regardless of how often you are able to trek or hike, trekking
poles can make the adventure much more enjoyable, with far less fatigue.
Many people are interested in obtaining a trekking pole or hiking stick, but
aren't quite sure how to use them. Many people simply pick up a stick in the
wilderness that is about 4 feet long, feels good in their hand, that isn't
too heavy and start hiking. For basic short hikes, walking sticks work just
fine, but once you have used a specially designed trekking pole, you will
quickly discard your hiking stick. Many of today's trekking poles are
adjustable in length, have spring loaded shock absorbers inside them and
utilize molded grips. They come in all kinds of lightweight materials, such
as aluminum, titanium, pure carbon and carbon fiber. The material the poles
are made of reflects directly on the price you will pay.
Picking the right
pole is quite easy. Most people find trekking poles to be the most
comfortable when they are about waist high in length, or just a bit longer.
It also depends on the terrain you most frequently hike or walk in. If the
terrain is quite steep and you're trekking at an incline a shorter pole will
be desired. If your trekking on a decline then you would want you poles at a
longer length. If you primarily walk on flat or slightly inclined terrain,
then one about waist high is sufficient. For this reason, adjustable
trekking poles are becoming quite popular. They can quickly be adjusted for
the user and the terrain that is encountered. If you are looking at buying a
fixed length pole, it is important to walk around the store with several
poles before purchasing in order to see how they feel to you.
If you are
looking at sectioned or adjustable poles, look for one that has three or
four sections. A true trekking pole is usually three or four sections. If
you're interested in Nordic Walking for the pure exercise element of walking
then a two section pole is good although there are three section poles
available for Nordic Walking also. When you have purchased the right pole
for you then you can proceed to adjust it to your proper height so you will
have an enjoyable experience. First hold the pole horizontally. Adjust the
bottom section first. It may take a few adjustments to get it right for your
height. Try to keep each section about a quarter to only half way extended.
Even though the poles may be made from very hard and durable materials, the
pole will be a whole lot stronger when the sections have more overlap from
one section to the next. While you are adjusting the pole, try to equalize
each section length inside of the others, so that one section isn't extended
more than the others. Once you have the sections adjusted to the right
length, turn the lock grip counter clockwise to lock everything in place.
Many poles have a
locking mechanism on each section. You simply adjust the length of each
section and twist the locking mechanism. Some poles are threaded and you
simply twist the sections individually to tighten them up.
Now that you have
the poles adjusted, simply walk around and see how they feels to you. If
it's not quite right make another adjustment until you get the length just
the way you want it. When you get your trekking pole adjusted the way you
want it, get out there and explore, get some exercise and see the world!
This website is
dedicated to offering equipment that enables people to experience nature,
fun, family and friends all together. We offer trekking poles and other
outdoor equipment which helps to add to this by creating a healthier you.
Trekking poles actually do this by working your arms, legs, core, heart and
all the muscles in between. So grab your family and friends and go have an
adventure.
Why buy a walking
stick is what everyone thinks. Walking sticks are used primarily for balance
and stability during a walk or hike. Those with Osteoporosis are ones who
have to worry about falling for if they do they will most likely break their
wrist or hip on impact. Walking sticks are to help prevent you from falling
or putting too much strain on your back or legs. If you put too much strain
on your back or legs you may collapse and lay there for days. These are
great for building up muscles in your arms as well. Any age can collapse so
don't think that this doesn't apply to you because you are young.
With a walking
stick you can go farther than you could have ever thought you could. Walking
sticks also make it much easier to go at a faster pace then you normally
walk at. These sticks also make walking much more fun for those who only
walk when they had nothing else to do. This makes walking much easier and
enjoyable for all ages if they have a walking stick of their own. These
aren't only used for walking they can also be used as a means of self
defense if needed to protect yourself.
Walking sticks
were originally used as a weapon for self defense for when you your in an
unequal condition. Walking sticks have been big in Europe for several years
now and are used year round in many countries. They have been big as weapons
and as sticks in Europe, mostly they were used as sticks but there were a
few used as weapons. These sticks are starting to become big in North
America but still haven't gotten the publicity to become big yet but sooner
or later they will but not yet.
Be one of the few
that will help inspire people to purchase one of these sticks by purchasing
one yourself. They will make your life much easier if you have a hard time
hiking or walking but you love to do it. You may think that it's a waste of
money but actually they aren't a waste at all. I bought one for myself to
test and see if the facts are true and they were this had shocked me. I
thought that they were just lying to get people to buy their product but
they actually weren't at all. They just told me a truth I didn't want to
believe.
Visit this
website if you are interested in purchasing a hiking stick.
All photographs (unless otherwise stated) are the property of Brian
Ramsey. None of the photographs may be reproduced without the express written
consent of Outdoor
Business Group Limited
and Brian Ramsey.